Blog

Cranberry Pecan Chicken Salad
Healthy
Anupama Mishra

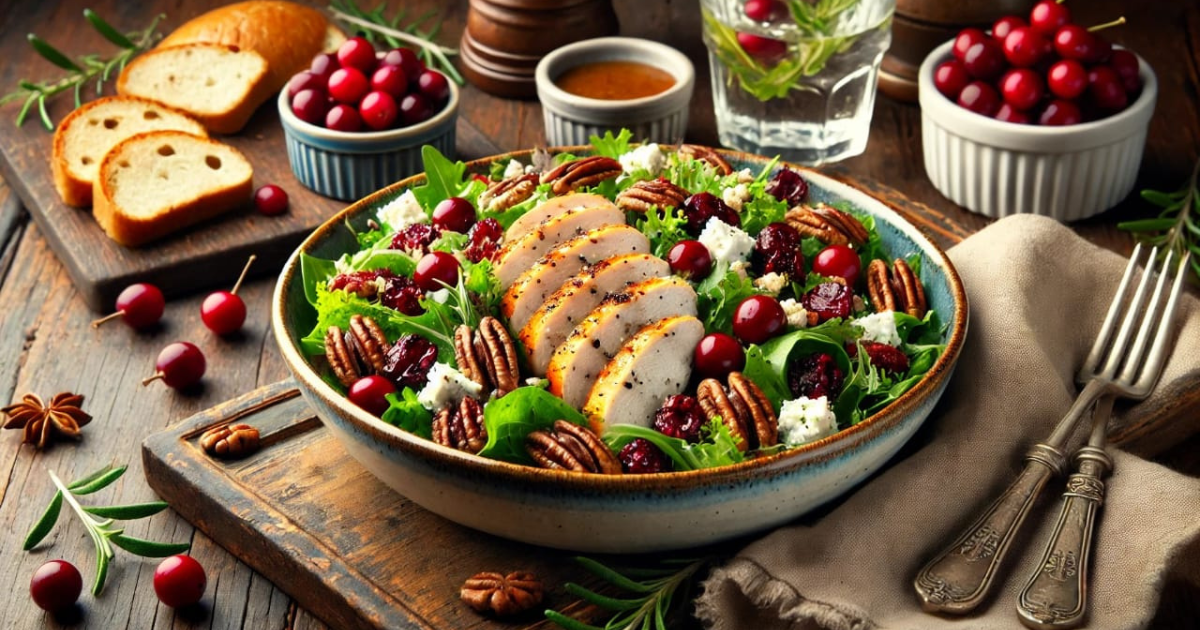
A Perfect Blend of Sweet & Savory: Cranberry Pecan Chicken Salad Recipe

Rating: 4.8/5 Preparation Time: 20 minutes It’s a super simple recipe for those who want to have a tasty meal within 30 minutes with sweet-savory taste. This is where this Cranberry Pecan Chicken Salad comes in handy! Another yummy dish that has the taste of pecans, cranberries and tender chicken that is easy to prepare and makes perfect as a lunch meal, side dish or dinner dish. History of Cranberry Pecan Chicken Salad Read more: Chicken Salad Recipe With Apples: A Better Way To Enjoy Your Salad Ingredients for Cranberry Pecan Chicken Salad Steps to Make This Easy Pecan Chicken Salad Step 1: Prepare the Chicken If adding any cooked chicken, the chicken should be shredded, or chopped into small cubes. Using rotisserie chicken is preferable for the taste, but you can bake, poach, grill chicken breasts as well. Step 2: Chop the Ingredients The pecans, celery, red onion and parsley should be minced, or chopped into small pieces. Measure out the cranberries and then prepping all the ingredients and leave it aside. Step 3:  Make the Dressing In a large bowl whisk the mayonnaise with the Dijon mustard, honey (if using) salt and pepper. Cranberry pecan chicken Salad dressing This will make a base dressing for the salad. Step 4: Combine Everything The next step is to mix the chopped chicken, cranberries, pecans, celery and red onto the dressing placed in the bowl. Mix all gently ensuring that the ingredients are well coated with the dressing. Step 5:  Garnish and Serve Sprinkle with chopped fresh parsley before serving and enjoy it warm, especially, on top of lettuce or include into sandwiches/wraps. Step 6:  Chill (Optional) If you want to achieve the best results and the different taste combinations to marinate well, the salad should be chilled for 30 minutes. But it can be consumed immediately if you are in a hurry. Nutritional Value (Per Serving) of Cranberry Pecan Chicken Salad Tips for the Perfect Cranberry Pecan Chicken Salad Frequently Asked Questions Yes! Actually, preparing this salad several hours before serving is preferred because it tastes even better when the ingredients have steamed or marinated well. The only thing you need to know is that it should be stored in the refrigerator. Substitutions for pecans are walnuts or almonds but if you do not like pecans, you can exclude it from the salad. They, too, give a pleasant crispness, and mesh well with the cranberries and chicken. You can of course use fresh cranberries; however, they are quite sour, so this means that you may want to add more honey or a sweetener. This cranberry pecan chicken salad is yet another filling and delicious dish which combines crunchy and sweet ingredients to everyone’s taste. From a snack to share with family to entertaining your guest this salad is a staple that can be prepared any time of the year. Besides, with high nutrients density as well as being very simple to cook, it’s a valuable food to include in your weekly meals! Read similar posts:

Read More
Recipe for Broccoli Slaw
Healthy
Anupama Mishra

Crunchy, Fresh, and Flavourful: A Quick Broccoli Slaw Recipe for Your Healthy Cravings

Preparation Time: 15 minutes  Rating: 5/5 Need a flavorful side dish that’s crunchy, healthy and quick to prepare, then this Broccoli Slaw Recipe is perfect for you! Ideal for barbecues, picnics, take it to a pot luck or even for snacking, this slaw is a healthier take on a typical cabbage variety. With the delicious and zesty broccoli slaw dressing, it’s a dish that offers the best of both taste buds and constitutions. Broccoli Slaw History Read more: The Ultimate Harvest Bowl Recipe: A Healthy, Nutritious Delight Ingredients for Broccoli Slaw To make this delicious and nutrient-rich broccoli slaw recipe, you’ll need the following ingredients: For the Slaw: For the Broccoli Slaw Dressing: Steps to Make Broccoli Slaw Step 1: Prep the Vegetables  First chop the broccoli stems, carrots and red cabbage into shreds. Using a food processor much preferred, or a knife to achieve thin and uniform slices. If you don’t have the time to prepare all these ingredients you can buy a ready made broccoli slaw prepared from the supermarket. Step 2: Prepare the Broccoli Slaw Dressing  In a small bowl, using a fork mix the mayonnaise, apple cider vinegar, honey, dijon, mustard, salt & pepper. Although I used a balance of vinegar and honey, tweak the quantity to your desired; if you love your dressing tangy add more vinegar and if you want a sweet dressing add more honey. Step 3: Toss the Slaw  In one big bowl mix the broccoli, carrots, red cabbage, the green onions that were shredded. In turn, pour the dressing over the vegetables and toss the salad until it coats everything, which would make for that perfect dressing for vegetables. Step 4: Add the Finishing Touches  To complete the dish add in the dried cranberries or raisins and garnish with the toasted sunflower seeds or almonds. To eat you can serve immediately for a crisp feel in the mouth or for optimal taste you can leave in the refrigerator for about 30 minutes. Step 5: Serve and Enjoy!  Congratulations, your copy of broccoli slaw has now become ready and can be served. This is a very fitting dish that goes well with barbequed meats, sandwiches or; it can be taken alone with some bread as a light meal. Nutritional Value (Per Serving) Reasons to Make This Broccoli Slaw Recipe This broccoli slaw recipe is the best you’ll find on the internet when it comes to healthy, delicious, and easy recipes. It’s crispy and when combined with the broccoli slaw dressing, always gets devoured at any meal. Whether your have it on the side as a vegetable or snack, you will find this slaw to be one of the best. Why not try it today and get your taste buds something new and interesting. Read similar posts:

Read More
Baby Back ribs. Easy & delicious
Cuisine
Anupama Mishra

Mouthwatering Baby Back Ribs Recipe: The Ultimate Guide to Smoked Baby Back Ribs

Ratings: 4.9/5 Preparation Time: 20 minutes  Cooking Time: 4 hours  Total Time: 4 hours 20 minutes  When it comes to a dish of baby back ribs there is nothing better than seeing them cooked to perfection. No matter whether you are going to have a family dinner or are planning a barbecue party at the backyard, the following recipe for the baby back ribs will make your guests wolf down their plates. The history of baby back ribs will be explored in this guide, along with how to cook the dish and nutrition information. If you follow these simple instructions you will be able to impress your family and friends with smoked baby back ribs! A Brief History of Baby Back Ribs Read more: Best Korean Braised Pork Ribs: Galbi Jjim Recipe Ingredients for Baby Back Ribs Recipe Steps to Make Perfect Smoked Baby Back Ribs Step 1: Preparation Step 2: Smoking the Ribs Step 3: Wrap and Finish Step 4: Serve Nutritional Value (Per Serving of Baby Back Ribs) Tips for Perfect Baby Back Ribs Creating perfect smoked baby back ribs may not be a very easy task, but with this specific recipe, you are sure to add it to your go-to list. The ribs are tender and juicy accompanied by a tasty and aromatic BBQ sauce, making the whole product irresistible. Who’s ready to jump into the world of BBQ grilling? If you want to learn about beginner smoker techniques or simply enjoy some delicious smoked baby back ribs in your backyard then please follow this guide. Bon appétit to all the family members and the friends! Read similar posts:

Read More
How to make roasted butternut squash salad
Healthy
Anupama Mishra

Delicious Roasted Butternut Squash Salad Recipe: A Fall Favorite

Rating: 4.8/5 Preparation Time: 15 minutes  Cooking Time: 30 minutes  Total Time: 45 minutes  Butternut squash salad is the union of the best sweet and tasty notes of vibrant productions and nutrients. From appetizers to snacks, or even a simple salad, here is a way to make yourself that perfect roasted butternut squash salad. This is the kind of food I like to prepare in my blog: delicious, easy to cook, with a long story behind and a few hints for nutritional characteristics. Brief History Of Butternut Squash Salad In Points Read more: Vibrant and Flavourful Greek Couscous Salad Recipe Ingredients for Roasted Butternut Squash Salad Steps to Prepare Roasted Butternut Squash Salad Step 1: Prepare the Butternut Squash Step 2: Roast the Squash Step 3: Assemble the Salad Step 4: Add the Dressing Step 5: Serve and Enjoy Nutritional Value of Roasted Butternut Squash Salad (per serving) How to Make the Most of your Roasted Butternut Squash Salad Some of the varieties in Butternut Squash Salad Recipes Make butternut squash salad a regular on your table this fall by preparing it using this recipe today. Read similar posts:

Read More
how to make pumpkin polenta recipe
Cuisine
Anupama Mishra

Creamy Pumpkin Polenta Recipe: A Cozy Fall Comfort Dish

Rating: 4.8/5  Preparation Time: 30 Minutes And if you are looking for the perfect polenta recipe you’ve come to the right place – this pumpkin polenta recipe! When mixing creamy polenta and the delicious flavor of pumpkin, this recipe is not only simple, yet it brings healthy benefit that deserves a plate in your dinner. Try it alongside your roasted meats or with your stew, pumpkin polenta will easily make its way to your list of favorite foods. Pumpkin Polenta Brief Profile Read more: The Best Torani Pumpkin Sauce Recipe: A Fall Favourite You’ll Love! Ingredients for Creamy Pumpkin Polenta Recipe To make this simple and flavorful dish, gather the following ingredients: Step-by-Step Instructions to Make Pumpkin Polenta Step 1: Prepare the Polenta Base Step 2: Add the Pumpkin Step 3: Enhance the Flavor Step 4: Final Touches Step 5: Garnish and Serve Nutritional Value of Pumpkin Polenta (Per Serving) Useful Recommendations about Perfect Pumpkin Polenta Most Frequently asked Questions Yes, You can absolutely make this dish vegan You don’t even need butter for sautéing the pasta and you don’t need Parmesan cheese. This pumpkin polenta is best served with roasted vegetables, grilled meats or sautéed mushrooms. It’s also good as a steaming agent in preparation of stews and other meals prepared through braising. Rather than waste leftovers it is recommended that pumpkin polenta be serve immediately, however, the leftover can be kept in an air-tight container and refrigerated for consumption within the next 3 days. If it becomes too thick, reheat it on the stovetop or in the microwave and then moisten with a little water and broth, if desired. This pumpkin polenta recipe is delicious yet healthy – it is the dinner you need for the fall and cozy evenings. Thanks to the useful tips on how to make this kind of yummy and creamy dessert, it will be helpful to prepare it many times. If you are a first timer to polenta or any expert in it, adding pumpkin to your recipe makes it delicious and special during the holiday seasons. Try this creamy pumpkin polenta out and don’t forget to share with us your experience by rating and leaving the review to this recipe below. Read similar posts:

Read More
How to make chuck eye steak
American
Anupama Mishra

Mouthwatering Chuck Eye Steak Recipe: A Budget-Friendly Delight!

Rating: 4.8/5 Preparation Time:  Prep Time: 10 minutes  Cook Time: 15 minutes  Total Time: 25 minutes  For lovers of tasty and juicy steak and at the same time to save, the chuck eye steak is the best solution. Otherwise well-known as superman beef this cut is tender and juicy and can be enjoyed at a relatively cheap price for the steak lovers. Below, you’ll find an easy and delicious chuck eye steak recipe that you can include on your list. A Brief History of Chuck Eye Steak Read more: Ingredients Instructions to Make Perfect Chuck Eye Steak Step 1: Wash the beef chuck eye steak First, take the chuck eye steaks from the refrigerator and allow to warm to room temperature for approximately half an hour. This ensures even cooking. Use a paper towel to pat the steaks dry to ensure that you get reduced moisture on them. Season both the top and bottom sides – use a great deal of salt and freshly ground black pepper. Step 2: Heat the Pan or Grill Heat the cast iron skillet over medium high heat, or preheat the entire grill to a medium- high level. Stir the olive oil and wait for it to heat up. When it is glossy but not smoking, then put the steak in. Step 3: Sear the Steak Gently put the seasoned chuck eye steaks in the hot skillet or on the hot grill. This takes approximately 3-4 minutes on each side depending on how you like it done of which in this case it is half grilled medium-rare steak. If you rather have your steak cooked more well done, you need to cook it 1-2 more minutes each side. Step 4: Add Garlic and Herbs When the meat is about tender, spend the last few minutes sautéing the minced garlic, rosemary and thyme and a tablespoon of butter. Ladling the butter and herbs over the steak is possible near the fire so that the preparation adds the needed flavor to the cooked meat. Step 5: Rest the Steak Take the steaks out of the pan or grill, let them to get to the stove for about 5 minutes. It enables the juices to flow and this keeps it moist and in this way we have the beef chuck eye steak. You can run the juiced steaks through the grinder then add a little of lemon juice to enhance the freshness. Step 6: Slice and Serve Once it is well done, cut the chuck eye steak crosswise to enhance its juicy characteristic. Best eaten with rice or any other side dish such as grilled asparagus or mashed potato. Nutritional Value of Chuck Eye Steak (Per Serving) Tips for the Best Chuck Eye Steak Frequently Asked Questions About Chuck Eye Steak Although the chuck eye is derived from the fifth rib and the ribeye from the sixth to twelfth ribs, both are very similar in the level of marbling as well as the taste. Chuck eye is less expensive of the two, and it is slightly less tender on an average. Yes! Olive oil with a hint of soy and garlic is a good one. However, in most instances, the food flavors used to prepare the steak are naturally sufficient since little spices are required. Apparently, chuck eye steak can be stored in an airtight container and placed in the fridge for not more than three days. Reheat lightly to prevent additional loss of moisture in the course of heating. As you already have the perfect chuck eye steak recipe at your disposal, there is only one thing to do – to cook it. Although people usually cook beef chucks in other ways or prepare pot roasts, the following beef chuck eye steak recipe will quickly become the favorite for an outdoor barbecue as well as an inside stovetop sear. Savor fork-tender chuck eye steak, all the while saving money on this cut that’s traditionally expensive. Read similar posts:

Read More
shiitake mushroom,shiitake mushroom recipes,shiitake mushroom recipe
Cuisine
Anupama Mishra

Delicious Shiitake Mushroom Stir-Fry Recipe: A Savoury Delight

Rating: 4.9/5 Prep Time: 10 minutes Cook Time: 15 minutes  Here is a quick stir fry recipe that has powerful and deep umami that the shiitake mushroom brings to the table, and if you’re looking for a wholesome flavourful dish, this is the one for you. This is made from vitamin and mineral enriched ingredients and is as tasty as can be for a working week or for a supplement to the meal list. Shiitake Mushrooms: a Brief History Read more: The Viral Japanese Cheesecake Recipe Ingredients for Shiitake Mushroom Stir-Fry To create this savoury stir-fry, you’ll need a handful of fresh ingredients: Step-by-Step Instructions for the Shiitake Mushroom Recipe Step 1: Cleaning of the Mushrooms Step 2: Make the Stir-Fry Sauce Step 3. Sauté the Vegetables Step 4: Add the Shiitake Mushrooms Step 5: Combine and Finish Step 6: Serve and Enjoy Nutritional Value of Shiitake Mushroom Stir-Fry Shiitake mushrooms are not only delicious but also packed with essential nutrients. Here’s a breakdown of the nutritional value per serving (approximately): Why You Should Add Shiitake Mushrooms to Your Diet Tips for Making the Best Shiitake Mushroom Recipe Shiitake mushrooms are versatile, flavorful, and packed with nutrients. Whether you’re a fan of shiitake mushroom recipes or trying them for the first time, this stir-fry is a simple yet satisfying way to enjoy their rich, savory taste. With a quick preparation time and minimal ingredients, it’s the perfect dish for any occasion. Don’t forget to share your experience in the comments and rate this shiitake mushroom recipe. Happy cooking! Read similar posts:

Read More
lemon vinaigrette dressing
Healthy
Anupama Mishra

Zesty Lemon Vinaigrette Dressing Recipe: A Perfect Homemade Delight

Rating: 4.9/5 Preparation Time: 10 minutes  So, if you are in search of an easily prepared addition that will lighten up your salads, grilled vegetables, or even roasted meats then our lemon vinaigrette dressing is perfect for you. This home made vinaigrette dressing is easy to prepare and leaves your mouth watery from the raw onions. It is so easy to replicate the same store-bought dressings at home using only a handful of ingredients which in turn makes it healthier too! A Quick History of Vinaigrette Dressings Read more: How To Make Fire Cider At Home: A Potent Tonic For Health And Vitality Ingredients for Lemon Vinaigrette Dressing To prepare this delightful homemade vinaigrette dressing, you’ll need: How to Make Lemon Vinaigrette Dressing This lemon vinaigrette dressing recipe is quick and easy to follow, requiring only a few steps: Step 1: Whisk the Ingredients On a separated bowl, roughly mix the lemon juice let it resolve, the Dijon mustard, minced garlic and if your recipe includes honey, blend it in. Step 2: Add Olive Oil Gradually, pour the extra virgin olive oil in this mixture while whisking. It assists in emulsifying the dressing or even in stabilising a creamy dressing. Step 3: Season Stir in salt, freshly ground black pepper and if desired, the rind of the lemon. Once the cooking process is complete, alter the salt and pepper, so that it meets your desired taste. Step 4: Taste and Adjust Season the dressing to its desired lemon, oil and spices then taste it. If effects of more sour flavor, you can add more of lemon juice than those called for in the given recipe. Step 5: Store or Serve Serving suggested: Consume the dip right after preparation or for longer storage: Chill and store in an airtight container for a week. It is necessary to stir the mixture before each application because oil and lemon may layer in the jar. How To Make Your Lemon Vinaigrette Dressing Perfect Nutritional Value (per serving) This vinaigrette is a healthy alternative to creamy, store-bought dressings. It’s low in sugar and carbs, high in heart-healthy fats, and a great source of vitamin C from the lemons. Why Make Homemade Lemon Vinaigrette Dressing? There are numerous reasons why making your own lemon vinaigrette dressing is a great idea: Recipe Match for Lemon Vinaigrette Dressing Preparing your own lemon vinaigrette dressing is not only easy but one of the best ways of guaranteeing you are consuming freshly made foods. You can make this particular dressing using basic ingredients kept in most pantry and it only takes ten minutes of your time. Please share with us how your lemon vinaigrette dressing recipe was like! Please, use the form below to leave a comment about the recipe and rate it. Happy cooking! Read similar posts:

Read More
Rainbow pizza recipe : tasty, colourful and healthy
Healthy
Anupama Mishra

Rainbow Pizza Recipe: A Vibrant, Healthy, and Easy-to-Make Delight”

Prep Time: 20 minutes  Cook Time: 15 minutes  Total Time: 35 minutes  Difficulty: Easy  Rating: 4.9/5 In general, when picturing pizza, one is most likely to imagine only a simple cheese or pepperoni pizza. But how about making your pizza colorful? A Rainbow Pizza Recipe is colorful, fun and healthy way to eat pizza and much more servings of vegetables! Brief history of Pizza While rainbow pizza is a modern twist, here’s a quick look at the origins of pizza: Read more: Best microwave pizza recipes for your house parties! Ingredients for Rainbow Pizza Recipe This rainbow pizza is customizable, so feel free to add or substitute ingredients based on your preference. Pizza Base:  Sauce:  Cheese:  Vegetables (arranged in rainbow order):  Optional toppings: Red onion, olives, cherry tomatoes, mushrooms, or any vegetable of your choice. Seasoning:  Steps to Make Easy Rainbow Pizza Recipe Step 1: Preheat Your Oven Preheat oven 425 degrees Fahrenheit or 220 degrees Celsius as a general requirement for roasting. Step 2: Prepare the Pizza Base Spread the pizza base dough to your desired thin via flattening with your fingertips on a lightly dusted area with flour. If dough is ready made then make sure that the crust is placed in a baking sheet. Step 3: Add the Sauce This should be done in such a way that it forms an even layer of marinara sauce right on the pizza base but leaving a small part ungarnished in order to have enough crust. Step 4: Add Cheese SPRAY: Sift mozzarella cheese over it to finish it. Step 5: Arrange the Vegetables Now for the fun part! Place the vegetables in a form of a rainbow You may want to peel the vegetables, but there are some you cannot peel. Begin with red bell peppers and proceed on through the row with the peppers in the order of their readiness, putting oranges, yellows, greens, purples next. Step 6: Season the Pizza Drizzle the top should be brushed with olive oil all over and sprinkled with salt and pepper with Italian seasoning. Step 7: Bake Put the pizza in the oven to bake for 12-15 minutes or until the crust turns to golden brown and the cheese melts. Step 8: Serve Once baked remove the pizza from the oven. You can also garnish it with fresh basil if you desire too. And that is it, let your appetite meet this great rainbow pizza and slice it. Nutritional Value of Rainbow Pizza (per slice) Why Choose a Rainbow Pizza? Rainbow Pizza Recipe Tips This rainbow pizza recipe is a great enjoyment for children and also an awesome and healthy variant to classic pizza. If it is to be prepared for family dintel, party or simply for yourself, this simple rainbow pizza recipe will definitely packs a punch. It is dense with nutrients and flavors and has thought visually. That is why, everyone should make their own rainbow pizza and enjoy the process of tasting different colours simultaneously! Read similar posts:

Read More
How to make Harvest Bowl
Healthy
Anupama Mishra

The Ultimate Harvest Bowl Recipe: A Healthy, Nutritious Delight

Preparation time: 20 minutes | Rating: 5/5 Feeling Hungry and in search of a healthy, satisfying and colorful meal? Look no further! The concept behind Harvest Bowl is more like a satisfying meal which includes crashed vegetables and grains, along with the chosen dressing. Whether you are cooking multiple meals for the week in advance or simply looking for a healthy one-bowl recipe – this harvest bowl recipe is perfect for you. Easy to prepare and made of easily available ingredients it guarantees to tempt your palate while providing your body with the necessary nutrients. Harvest Bowl Co., Ltd. Company Background Before we dive into the harvest bowl recipe, let’s take a look at its origins: Read more: Best Gazpacho Recipe: 1 Cool Bowl Of Soupy Happiness Ingredients for the Perfect Harvest Bowl This harvest bowl recipe is customizable to suit your preferences, but here’s a basic list to get started: For the Bowl: For the Harvest Bowl Dressing: Steps to Prepare the Harvest Bowl Step 1: Cook the Grains  It is important to first cook a base grain that will be used for this recipe. For this recipe, quinoa or brown rice is advisable. It entails a process of cooking the grains until they are fluffy by just following the directions on the package. Take them out and let them to sit for several minutes before you taste. Step 2: Roasting the sweet potatoes and the chickpeas  Turning now to the preparation process, heat your oven to 4000Fahrenheit or 200 degrees Celsius. Place the chopped sweet potatoes on a baking sheet and sprinkle with olive oil, salt, Pepper. Place them in a way that they are layer by layer. Broil for 25 to 30 minutes turning once halfway through. In another pan, brown the chickpeas with olive oil, Paprika, and salt, for about 15 minutes until crispy. Step 3: Prepare the Vegetables  When the sweet potatoes and chickpeas are roasting, it’s time to deal with the greens. About kale, you may just need to rub with some olive oil and lemon juice to tenderize it or can fry it for few minutes till it softens. Step 4: The prize for the best recipe in this category is none other than the Harvest Bowl Dressing.  To make the dressing , in a small bowl add tahini, olive oil, maple syrup, apple cider vinegar, dijon mustard, salt and pepper. This harvest bowl dressing is creamy, slightly tangy to provide you with an additional layer of taste to your bowl. Step 5: Assemble the Bowl  When you have all the components set, its time to assemble them. In other words, for every bowl incorporate quinoa or brown rice as the foundation. Add layers of roasted sweet potatoes, chickpeas, kale, avocado, cranberries or pomegranate seeds, pumpkin seeds on top. Lastly pour the dressing from the harvest bowl dressing and you have your harvest bowl ready to be served. Nutritional Value of the Harvest Bowl This harvest bowl recipe offers a balanced mix of macronutrients and micronutrients: Why You Should Make This Harvest Bowl Recipe Here are certain reasons why this is a perfect recipe for you. Jiko is more than a harvest bowl, it’s an ode to whole-ingredient goodness that’s available to order during lunch. Whether the goal is to make a gourmet dinner or just a quick, HEALTHY meal, this harvest bowl provides a delicious and easy meal plan. This recipe is accessible in its simplicity and it truly can be customized with several of your favorite vegetables, proteins, and grains. When you are ready to make a delicious change, consider preparing this Harvest Bowl recipe today and see the reason behind incorporating the three Hs into it! Read similar posts:

Read More

I’m Jessica, your new guide. Welcome to my Cookbook!

Lorem ipsum dolor sit amet, ad consectetur adi picibe elit, sed do eiusmod tempor inci didunt quo labore e dolore magna aliqua ut.

Workshop

Subscribe
Subscribe to our newsletter and be informed about new recipes & workshops.

Follow me on Social Media