Blog

Copycat Costco Chicken Salad Recipe. Easy to make
Healthy
Sanidhya Gupta

Delicious Costco Chicken Salad Recipe: A Perfect Blend of Freshness and Flavour

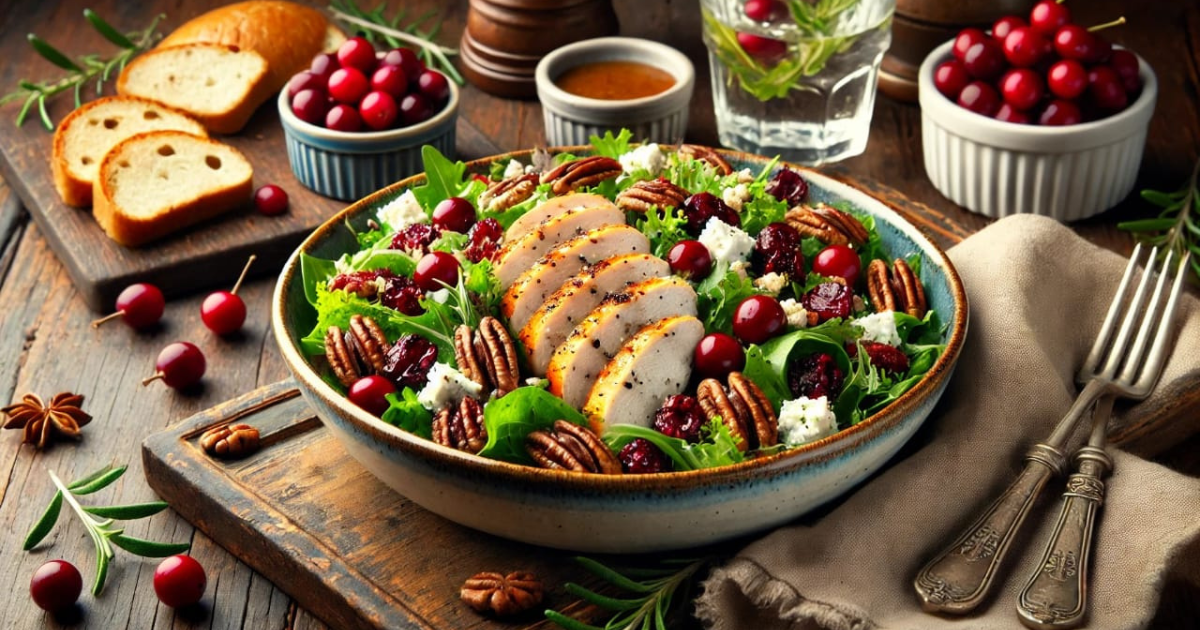
Rated an impressive 4.5 out of 5, this delectable delight takes just 10-15 minutes to be cooked, making it ideal for quick and tasty eating. If you have had the famous Costco Chicken Salad, then you know how delightful and creamy it is. The rotisserie chicken from Costco is a favourite of many, but with their chicken salad, they really take it up a notch. Well, this Copycat Costco Chicken Salad Recipe with Cranberries will allow you to produce that same flavour at home. Whether making for lunch during the week or a special occasion, it will be enjoyed by many. The Rise of Costco Chicken Salad Read more: How To Make German Potato Salad – Warm & Refreshing! Ingredients for the Copycat Costco Chicken Salad Recipe Creating a copycat Costco chicken salad recipe requires fresh ingredients that deliver the perfect blend of textures and flavors. Here’s what you’ll need: How to Make the Costco Chicken Salad with Cranberries Recipe Step 1 Bring On the Chicken Tear that rotisserie chicken apart. Get rid of the skin and use your hands (or two forks) to pull apart the meat into bite-sized pieces. You’ll want some of both white and dark for maximum flavor. Step 2 Veggie Chop Time Give a fine chop to the celery and red onion. They provide a good crunch and slight bite in this creamy salad. Step 3 Let’s Dress It Up Combine shredded chicken, chopped celery, and onion with the dressing in the bowl. Toss everything together gently until the chicken is evenly coated. Step 5 If you are making the Costco chicken salad recipe that has cranberries, this is the step where you add dried cranberries and slivered almonds. The cranberries are sweet, and the almonds provide a bit of crunch to the recipe and take the classic flavor to the next level. Step 6 To get full effect or the best flavour, allow the chicken salad to sit in the refrigerator for at least an hour before eating. This way all the flavours come together perfectly.  Why You’ll Love This Recipe? Costco Chicken Salad Recipe Tips for the Best Salad Serving Ideas Nutritional Value (per serving) This Costco Chicken Salad Recipe brings together the creamy, savoury flavours you love from the original, with the added option of cranberries for a sweet twist. So why not give this copycat Costco chicken salad recipe a try today and enjoy the taste of Costco right from your kitchen? Read similar posts:

Read More
How to make Chocolate Chip Zucchini Muffins
Meals
Sanidhya Gupta

Best Chocolate Chip Zucchini Muffins Recipe

Chocolate chip zucchini muffins are the most flavourful moist muffins cooked with crispy zucchini for moisture and nutrition. It is combined with chocolate chips for sweetness, making a mix of health and taste. The Best Chocolate Chip Zucchini Muffins: A Delicious and Healthy Recipe If you are a fan of rich decadent chocolate dishes but still prefer to eat healthy then Chocolate Chip Zucchini Muffins have got you covered! These muffins are filled with nutrition and chocolate, making it a perfect dessert for your family and children. How was Chocolate Chip Zucchini Muffins invented? Chocolate Chip Zucchini Muffins still remains as a cherished dessert in many households, allowing foodies to fulfill their chocolate cravings. This blog will teach you to bake chocolate chip zucchini muffins, deliciously loaded with wholesome ingredients.  If you’re a beginner or a master chef, this recipe will become your go to favorites. Related: Four best Chocolate Chip Zucchini Muffin recipes! Why Zucchini in Muffins? Vegetables might be seem like an arbitrary ingredient for a dessert, but Zucchini comes with great quality, making it an ideal ingredient for chocolate chip muffins. Its mild flavour mixes well with the batter, not overpowering the taste of chocolate. Its inherent moisture reduces the need to use excess butter or oil. Therefore, making these muffins moist and healthy. Ingredients for Chocolate Chip Zucchini Muffins: Dry Ingredients: Wet Ingredients: Add-ins: ¾ cup chocolate chips (use dark or semi-sweet for a rich flavour) ½ cup chopped nuts (optional, like walnuts or pecans for crunch) Step-by-step Recipe for Chocolate Chip Zucchini Muffins: Step 1 Starting with any of the tips it is first customary to prepare the mold and fix it, so first let’s preheat the oven to 350 degrees. Take a muffin tin and line it with paper liners. You’ll also want non-stick spray to lightly spray the muffin liners. Step 2 Take the zucchini and grate it using a box grater or use a food processor to do the job much quicker. Do not peel it — the skin contains most of the nutrients. After grating, dab your zuchinni with cooking papers to remove excess water. Do not use the kitchen paper to squeeze it from excess water as the water content is important for the texture of your chocolate chip zucchini muffins. Step 3 In a big bowl, throw in plain flour, coco powder, baking powder, basing soda, and salt and cinnamon. In this ingredients lie the best chocolate structure of the muffins to be prepared. Step 4 Whisk the eggs, oil, sugar, and vanilla extract in another bigger bowl until all the ingredients have blended. Add the Greek yogurt followed by the grated zucchini. Step 5 Add the dry mixture in parts to the wet mixture while mixing with a spatula. Do not mix the batter more than necessary as this can result in tough muffins. Stop mixing when there aren’t any more large streaks of flour in the batter, but light lumps are still present. Step 6 Add the crushed nuts and the chocolate chips. To make things more chocolaty, reserve some chocolate chips to place on top of each muffin before they go into the oven. This will give the chocolate chip zucchini muffins an exquisite appearance with melted chocolate on top just like what you get in the bakery. Step 7 Spoon equal portions of the batter into the muffin cups filling them about three-quarters full. Place in the preheated oven and allow to bake for between 18 and 22 minutes or until the toothpick inserted into the thickest part of the muffin comes out clean or with only a few crumbs. Remember that it’s also possible to hit melted chocolate because of the presence of chocolate chips while checking if the mixture is cooked. Step 8 After baking, leave the muffins in the pan to cool for 5 minutes then move the muffins to a wire rack for cooling. These healthy chocolate chip zucchini muffins are best eaten when they are slightly warm so that one can fully taste the melted chocolate chips! Perfecting your Chocolate Chip Zucchini Muffins Why You’ll Love This Recipe These easy chocolate chip zucchini muffins recipe in the form of chocolate chip muffins are delicious, and perfect anytime for breakfast, usually with tea or other beverages, or dessert. The deep chocolate flavor with zucchini hidden within, makes it appealing for adults and kids alike. Besides, you do not need to feel sorry for yourself as these are indulgent muffins dressed with the goodness of chocolate batters- muffin combination. They are the ultimate comfort food with a healthy twist! Nutritional Value of healthy Chocolate Chip Zucchini Muffins It can vary based on the recipe, but here’s an approximate breakdown for one standard-sized muffin (around 100 grams): Calories: 180-220 kcal Carbohydrates: 25-30 grams Sugars: 10-15 grams Protein: 3-5 grams Fat: 7-10 grams Fiber: 1-3 grams Vitamins/Minerals: Contains small amounts of vitamin C (from zucchini), iron, and calcium. Comment down below what more dishes you can make from Zucchini! Read more similar recipes: https://www.onceuponachef.com/recipes/zucchini-muffins-with-chocolate-chips.html https://tinaschic.com/baking-101/baking-muffins-101/

Read More
How to Make Fire Cider at Home
Healthy
Sanidhya Gupta

How To Make Fire Cider At Home: A Potent Tonic For Health And Vitality

Fire Cider is one of the ancient herbal preparations appreciated among the people and it is attributed to have immune enhancing, anti-inflammatory and digestive properties. Fire Cider: What is it? Fire Cider is a folk remedy that has been utilized much before recorded history. It is a tonic made using vinegar soaked with herbs and spices for especially boosting immunity and aiding digestion among others. These are some Fire Cider Benefits. Quite commonly made by the people at home, It has been adopted as a therapeutic drink mostly around flu and cold seasons. This zesty-sharp-hot drink is a combination of valuable ingredients such as garlic, ginger, horseradish, honey, and apple cider vinegar that you would like to have in your kitchen’s natural medicine cabinet. Origins of Fire Cider: Brief Overview Wonderful for ages of ciders: It is perhaps more related to the age old concept of herbalism particularly western herbalism. Unlike honey lemon and green tea, it has many other values when it comes in cold seasons. Resuscitated by Rosemary Gladstar: We can say that Fire Cider was first popularized after the herbalist Rosemary Gladstar, who brought the recipe to light in the 70s. She advocated using it in her teachings of herbal medicine and promoted its efficacy in enhancing immunity. Folk Medicine Tradition: It also falls under the category of “oxymels” that are vinegar and honey based therapeutic solutions for cough and cold and other ailments of the past. Culinary and Medicinal Use: With time, Fire Cider has not only been accepted as an herbal tonic but also as food ingredient among other things for use in salad dressings, marinades and drinks. Read more: Healthy Recipes Ingredients for Fire Cider Making your own Fire Cider is a straightforward process, requiring only a few powerful ingredients. Here’s what you’ll need: How to make Fire Cider: A Step-by-step guide Now that you’ve gathered all the ingredients, let’s get started on the process of making Fire Cider. Here’s a simple, step-by-step guide to help you prepare this health-boosting tonic at home: STEP 1: Prepare the Ingredients Begin by grating and chopping all the fresh ingredients: horseradish, garlic, ginger, onions, turmeric, and hot peppers. Make sure to wear gloves when handling hot peppers to avoid skin irritation. STEP 2: Combine Ingredients Place the chopped ingredients into a clean, quart-sized glass jar. Pack them in tightly, ensuring they take up about two-thirds of the jar’s volume. STEP 3: Add Lemon and Cayenne  Add the zest and juice of one lemon to the jar, followed by a tablespoon of ground cayenne pepper for that extra kick. STEP 4: Pour Apple Cider Vinegar Fill the jar with raw, unfiltered apple cider vinegar, ensuring all the ingredients are fully submerged. A plastic lid or a piece of parchment paper under the metal lid can help prevent vinegar from corroding the metal. STEP 5: Seal and Store Once the jar is sealed, store it in a cool, dark place for about 4 to 6 weeks. Shake the jar daily to help the infusion process. STEP 6: Strain the Mixture After 4 to 6 weeks, strain the mixture using a fine-mesh sieve or cheesecloth, squeezing out as much liquid as possible from the solids. STEP 7: Add Honey (Optional)  If you prefer your Fire Cider on the sweeter side, add honey to taste. Stir the mixture until the honey is fully dissolved. STEP 8: Bottle and Store  Pour your finished Fire Cider into clean glass bottles or jars. Store it in the refrigerator, where it will last for several months. Fire Cider Benefits Before getting to the recipe for the Fire Cider, one has to explain why this health tonic receives so much acclaim. The advantages include: Nutritional value of Fire Cider Fire Cider is not only a flavorful tonic but also packs a powerful nutritional punch. Here’s a breakdown of the key nutrients in this concoction: Fire Cider is an age-old remedy that continues to stand the test of time, offering a simple yet effective way to support your health. Whether you’re looking to boost your immunity, improve digestion, or simply add a flavorful kick to your meals, Fire Cider is a powerful addition to your wellness routine. Comment down below what other healthy drinks do you prefer with high nutritional value! Read similar content:

Read More

I’m Jessica, your new guide. Welcome to my Cookbook!

Lorem ipsum dolor sit amet, ad consectetur adi picibe elit, sed do eiusmod tempor inci didunt quo labore e dolore magna aliqua ut.

Workshop

Subscribe
Subscribe to our newsletter and be informed about new recipes & workshops.

Follow me on Social Media

Scroll to Top