Blog

shiitake mushroom,shiitake mushroom recipes,shiitake mushroom recipe
Cuisine
Anupama Mishra

Delicious Shiitake Mushroom Stir-Fry Recipe: A Savoury Delight

Rating: 4.9/5 Prep Time: 10 minutes Cook Time: 15 minutes  Here is a quick stir fry recipe that has powerful and deep umami that the shiitake mushroom brings to the table, and if you’re looking for a wholesome flavourful dish, this is the one for you. This is made from vitamin and mineral enriched ingredients and is as tasty as can be for a working week or for a supplement to the meal list. Shiitake Mushrooms: a Brief History Read more: The Viral Japanese Cheesecake Recipe Ingredients for Shiitake Mushroom Stir-Fry To create this savoury stir-fry, you’ll need a handful of fresh ingredients: Step-by-Step Instructions for the Shiitake Mushroom Recipe Step 1: Cleaning of the Mushrooms Step 2: Make the Stir-Fry Sauce Step 3. Sauté the Vegetables Step 4: Add the Shiitake Mushrooms Step 5: Combine and Finish Step 6: Serve and Enjoy Nutritional Value of Shiitake Mushroom Stir-Fry Shiitake mushrooms are not only delicious but also packed with essential nutrients. Here’s a breakdown of the nutritional value per serving (approximately): Why You Should Add Shiitake Mushrooms to Your Diet Tips for Making the Best Shiitake Mushroom Recipe Shiitake mushrooms are versatile, flavorful, and packed with nutrients. Whether you’re a fan of shiitake mushroom recipes or trying them for the first time, this stir-fry is a simple yet satisfying way to enjoy their rich, savory taste. With a quick preparation time and minimal ingredients, it’s the perfect dish for any occasion. Don’t forget to share your experience in the comments and rate this shiitake mushroom recipe. Happy cooking! Read similar posts:

Read More
Rainbow pizza recipe : tasty, colourful and healthy
Healthy
Anupama Mishra

Rainbow Pizza Recipe: A Vibrant, Healthy, and Easy-to-Make Delight”

Prep Time: 20 minutes  Cook Time: 15 minutes  Total Time: 35 minutes  Difficulty: Easy  Rating: 4.9/5 In general, when picturing pizza, one is most likely to imagine only a simple cheese or pepperoni pizza. But how about making your pizza colorful? A Rainbow Pizza Recipe is colorful, fun and healthy way to eat pizza and much more servings of vegetables! Brief history of Pizza While rainbow pizza is a modern twist, here’s a quick look at the origins of pizza: Read more: Best microwave pizza recipes for your house parties! Ingredients for Rainbow Pizza Recipe This rainbow pizza is customizable, so feel free to add or substitute ingredients based on your preference. Pizza Base:  Sauce:  Cheese:  Vegetables (arranged in rainbow order):  Optional toppings: Red onion, olives, cherry tomatoes, mushrooms, or any vegetable of your choice. Seasoning:  Steps to Make Easy Rainbow Pizza Recipe Step 1: Preheat Your Oven Preheat oven 425 degrees Fahrenheit or 220 degrees Celsius as a general requirement for roasting. Step 2: Prepare the Pizza Base Spread the pizza base dough to your desired thin via flattening with your fingertips on a lightly dusted area with flour. If dough is ready made then make sure that the crust is placed in a baking sheet. Step 3: Add the Sauce This should be done in such a way that it forms an even layer of marinara sauce right on the pizza base but leaving a small part ungarnished in order to have enough crust. Step 4: Add Cheese SPRAY: Sift mozzarella cheese over it to finish it. Step 5: Arrange the Vegetables Now for the fun part! Place the vegetables in a form of a rainbow You may want to peel the vegetables, but there are some you cannot peel. Begin with red bell peppers and proceed on through the row with the peppers in the order of their readiness, putting oranges, yellows, greens, purples next. Step 6: Season the Pizza Drizzle the top should be brushed with olive oil all over and sprinkled with salt and pepper with Italian seasoning. Step 7: Bake Put the pizza in the oven to bake for 12-15 minutes or until the crust turns to golden brown and the cheese melts. Step 8: Serve Once baked remove the pizza from the oven. You can also garnish it with fresh basil if you desire too. And that is it, let your appetite meet this great rainbow pizza and slice it. Nutritional Value of Rainbow Pizza (per slice) Why Choose a Rainbow Pizza? Rainbow Pizza Recipe Tips This rainbow pizza recipe is a great enjoyment for children and also an awesome and healthy variant to classic pizza. If it is to be prepared for family dintel, party or simply for yourself, this simple rainbow pizza recipe will definitely packs a punch. It is dense with nutrients and flavors and has thought visually. That is why, everyone should make their own rainbow pizza and enjoy the process of tasting different colours simultaneously! Read similar posts:

Read More
How to make clafoutis recipe
Cuisine
Anupama Mishra

The Perfect Cherry Clafoutis Recipe: A Classic French Delight

Searching for a dessert that stands for a simple dish but at the same time looks sophisticated? Now let me introduce you to one more lovely French dish – clafoutis that is very simple to prepare and is tastes absolutely divine. From the newest home cook to the one who has been cooking for a long time, this cherry clafoutis recipe is going to blow their mind. Like a custard pie that’s full of cherries that can either be juicy or candied, it’s great for all occasions. Clafoutis: OUR EGGCELLENT JOURNEY Clafoutis has had a very long history. Lets see what is it. Read more: Delicious Ron Ron Juice recipe from Jersey Shore! Ingredients for the Best Cherry Clafoutis Recipe Following are the ingredients necessary for this recipe. Step-by-Step: How to Make Cherry Clafoutis Step 1: Prepare the Cherries Wash the cherries with water first defendants Cherries should be washed before anything else. However, if easier handling while eating is a concern, pit the cherries. You can do this for a more classic approach to the recipe, but you don’t have to. Step 2: Preheat and Grease It will be necessary to set your oven to 350°F (175°C) before beginning to bake. Smear a baking dish with butter in a rich layer to avoid the clafoutis from sticking on the bottom. Step 3: Blend the Batter Whisk the eggs and sugar in a large bowl until it is nearly white and light in color. Slowly incorporate the flour and salt with the mixture, whisk until the batter is smooth and lump free. Gradually include the milk and vinegar and the vanilla extract into the mix and stir until you get a lump-free batter. Step 4: Assemble the Clafoutis Place the cherries on a layer on the greased baking dish, as finely spread out as possible. Spoon the batter gently over the cherries so that they are well coated at the base of the tin. Step 5: Bake The clafoutis should be baked in the preheated oven for forty minutes or until the top is slightly brown and it forms a layer on the edges. The center will be slightly jiggly but will begin to firm up as it cools. Step 6: Serve and Enjoy Once baked the clafoutis must be allowed to cool a little for ease of serving and slicing for prettiness. The final stage is just sprinkling with powdered sugar, depending on your preference it can be done lightly or generously. It is best consumed served warm or at room temperature in a temperature controlled environment. Nutritional Value (Per Serving) Lets see how much nutrition this dish holds. Tips for Perfecting Your Clafoutis Recipe Some useful ideas towards making your Clafoutis recipe even more delectable This tasty cherry clafoutis recipe is incredibly easy to prepare but is a traditional French dish everyone can enjoy at home. It is a light dessert with a custard, and cherries are a product that will touch the hearts of children and grown-ups. Want to try this original clafoutis recipe? Feel free to tell us how it went in the comments section below and even post your own twist! Read similar posts:

Read More
Easy Fideo recipe noodles
Cuisine
Anupama Mishra

Savor the Flavors of Mexico: The Ultimate Fideo Recipe for Perfectly Seasoned Noodles

Ratings: 4.9/5 Preparation Time: 30 minutes  The fideo recipe noodles are both unpretentious and hearty and are most suited to a family dinner or for a weeknight supper. For those who have never prepared fideo noodles before or for those who are regular users of this dish, is a perfect chance to cook an easy and tasty Mexican dish. What is Fideo? Fideo is a type of slender pasta that forms a resemblance with vermicelli and is toasted and boiled in a savoury soup. This is how the beauty of it resides – in the project’s flexibility. It can also be made as a broth dish, or simply as a pasta dish, with tomatoes, garlic and spices which add to the appeal of the meal. History of Fideo Noodles Fiedeo noodles has a very ancient reference. Read more: Easy & Authentic Pancit Recipe for Perfect Noodles Ingredients for the Perfect Fideo Recipe To prepare this comforting bowl of noodles, you will need the following ingredients: Step-by-Step Guide to Making Fideo Noodles Step 1: Toast the Noodles Heat the olive oil in large skillet, over the medium heat. Include the fideo noodles stirring for 3-5 minutes or till golden color. It is important as it gives the noodles that typical and welcome peanutty flavor. Take off from flame and allow to stand. Step 2: Prepare the Sauce Melt butter in the same skillet over medium heat then add the onions and garlic and cook until tender (about 3 minutes). Add diced tomatoes, tomato paste, cumin powder and if you are using chili powder. Leave the mixture to stew for five minutes to enhance the taste of the soup. Step 3: Add the Broth Gradually add the chicken or vegetable stock and mix the soup gently. Reserve 1/2 cup of the mixture and combine the remaining mixture with milk; heat over low heat until the mixture comes to a boil. Step 4: Cook the Noodles Place the toasted fideo noodles into the skillet to cover the broth and make sure the noodles are well spread out. Gently turn the heat down and let those noodles continue cooking for 8-10 minutes, uncovered, until the noodles are perfectly done and majority of the liquids has been absorbed. Step 5: Season and Garnish  When the noodles get soft enough drain and put some salt and black pepper to your preference. But, transfer the skillet to the off-burner and garnish with chopped raw cilantro. It is best to accompany this with a wedge or two of lime. Nutritional Value per Serving While this dish is yummy, it holds a lot of nutrients in it. This dish is a great balance of flavors, offering a comforting yet light meal packed with essential nutrients. Pro Tips for the Best Fideo Noodles Variations to Try This fideo recipe is as close to a Mexican home cook recipe as you can get and is sure to bring warmth, flavor and familiarity. Hi everyone, before leaving don’t forget to rate this recipe and also tell us how you enjoyed your fideo noodles in the comment section! Read similar posts:

Read More
coq au vin recipe
Cuisine
Anupama Mishra

Coq au Vin Recipe: A Classic French Dish with a Rich History

Prep Time: 25 minutes | Cook Time: 1 hour 30 minutes | Total Time: 1 hour 55 minutes | Rating: 5/5 Coq au Vin Recipe– ‘Chick in Wine’ – is one of the famous branded French style cooked dishes which typically requires a complex of easily cooked excellent ingredients and well-cooked-in-vine. This outstanding and simple recipe of chicken cooked with red wine, mushrooms, onions, and chicken seasonings is perfect for any dinner parties and family get-together occasions. History of Coq au Vin Lets understand how it came into existence Read more: Chicken Salad Recipe With Apples: A Better Way To Enjoy Your Salad Ingredients for Coq au Vin Recipe Followings are the essential ingredients to make this dish a success. Step-by-Step Guide to Making Chicken Coq au Vin Step 1: Start with the marinade process of the chicken. Put the chicken pieces in a large bowl into which pour the wine. Another takes a small bunch of garlic, several sprigs of thyme, and one bay leaf. You might say that it is best to cover and refrigerate for at least 4 hours or better yet, for the night. Step 2: In a big deep pan, done the bacon till crispy over medium heat. Take the bacon out with the help of a slotted spoon leaving the bacon fats in the pot. Step 3: Take the chicken out of the marinating bowl, discard the marinade and dressing the chicken with some salt and black pepper. Fry the chicken pieces in the bacon fat, 3-4 minutes per side until the pieces are golden brown. Remove the chicken from the spicy sauce and place it on a plate and set aside. Step 4: At the same pot, also put the pearl onions, mushrooms and carrot. Stir for about 5-7 minutes or until they have turned soft. Next, throw in the minced garlic and tomato paste stirring the mixture for about one minute. Step 5: Pour the brandy into the pot and then carefully light it with a long match or lighter carefully. Let the alcohol evaporate and the sauce’s taste become richer. Step 6: Put back the seared chicken into the pot. That’s when you introduce the reserved wine marinade, chicken broth, thyme, and bay leaf into the mix. Heat it up until it can simmer and then reduce the heat. Cover and simmer for 1 to 1.5 hours, when chicken has become tender and is well-done. Step 7: When the chicken is done, lookup from the pot. To make the paste combine 2 tablespoons of flour and softened butter. Use this mixture to whisk into the sauce in an effort to thicken it up. Continue processing it for an additional of 10 minutes. Step 8:  Add the chicken back into the pot and mix in the cooked bacon and top with parsley. Accompany this coq au vin with mashed potatoes, or buttered noodles or even crusty bread which will complete the meal. Nutritional Value Per Serving This is the nutrition of this meal per serving Tips for the Perfect Coq au Vin Some Points to be Considered while Making Coq au Vin Coq au vin recipe is the perfect choice when you want to impress your guests with a classic French meal. Whether you’re cooking it for a special occasion or just a cozy dinner at home, this dish is guaranteed to leave everyone asking for seconds. Enjoy this Coq au Vin recipe, and don’t forget to share it with friends who appreciate fine food! Read similar posts:

Read More
How to make Pancit
Cuisine
Anupama Mishra

Easy & Authentic Pancit Recipe for Perfect Noodles

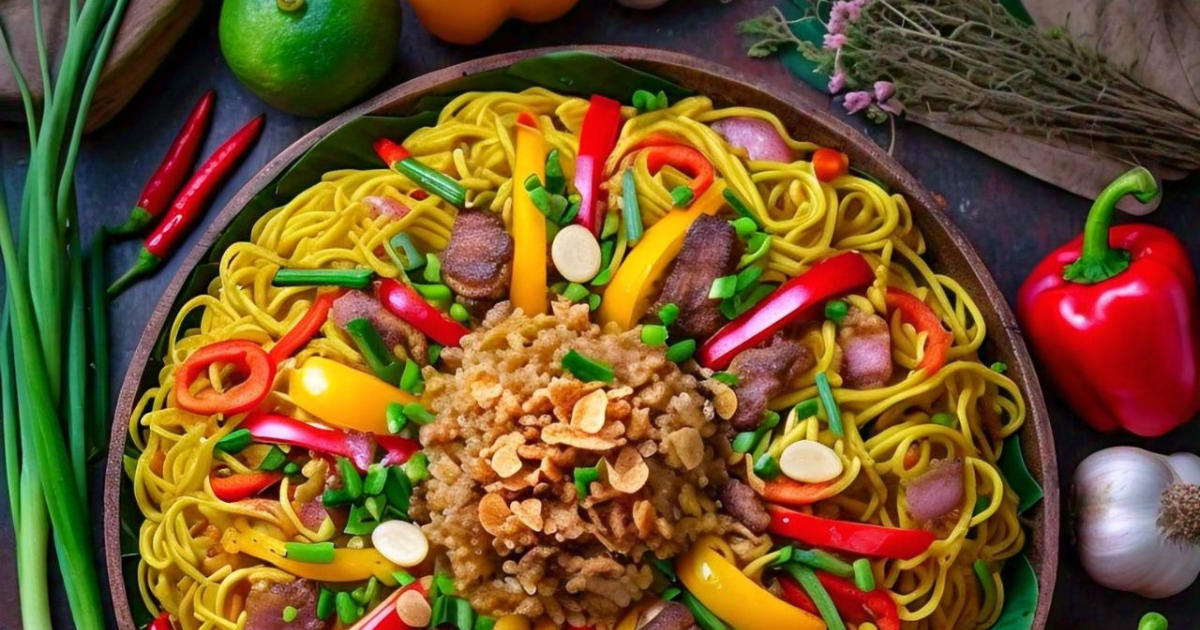
If you’re a Filipino food lover, then you are not unfamiliar with Pancit, a favorite dish made with noodles, vegetables and meat or seafood. Well, for this post, we’re going to show you a no-nonsense easy to follow pancit recipe that embodies the spirit of one great filipino dish. It’s easy to prepare and a fantastic choice, no matter whether you’re going to feed the family on a weekday or have guests for supper. A Quick History of Pancit Pancit has a well rooted history as it was originated by Chinese migrant workers in the Philippines. It has developed into different regional types though it remains as one of the well-loved Filipino dishes. Here’s a brief history: Read more: Authentic Taiwanese Beef Noodle Soup Recipe Ingredients for the dish For this pancit recipe, we’ll be using noodles (either bihon or canton), along with a mix of vegetables, chicken, and seasonings to bring out authentic flavours. Here’s what you’ll need: Steps to Make Pancit This simple pancit recipe will only take less than 35 minutes, preparation time inclusive. Let’s get cooking! Step 1: Prepare the Pancit Noodles Begin this dish by soaking the noodles (if using bihon) in lukewarm water for 10 minutes and drain. If using pancit canton, put aside then add it straight to the broth after cooking. Step 2: Cook the Chicken Heat the oil in a large skillet or wok Conditions over Medium flame. When the garlic turns brown in color add the onions and stir until they emit a nice aroma. Introduce the chicken strips and fry until they are equally brown on the outside. Add soy sauce, oyster sauce and fish sauce as the seasonings (Fish sauce can be omitted based on personal preference). Step 3: Cook the Vegetables Add the carrots, bell pepper, green beans and cabbage. Stir-fry for 3-4minutes or until the vegetables will no longer remain hard but they should be crispy. Step 4: Combine the Noodles Remove the chicken from the pan and pour the chicken broth into the same pan bringing to a simmer. Finally, pour the noodles into the hot broth and mix it well with the sauce and the vegetables in a frequent manner. Simmer the dish until all the noodles have swollen up and are cooked through. Step 5: Season and Serve Add salt and pepper on the pancit and mix it well. Sprinkle freshly chopped onions on the top and accompany it with lemon halves on the side for the lemony sensation. Nutritional Value of the recipe This dish is not only flavourful but also a relatively healthy option, especially when loaded with vegetables. Here’s a rough breakdown of the nutritional value for one serving (assuming four servings): While the nutritional value can vary based on the type of pancit noodles used and the amount of oil and meat added, this dish is a balanced source of carbohydrates, protein, and essential vitamins from the vegetables. Varieties You Can Try Another advantage of understand the pancit is that it is very convenient since there is no limit in combination. Absolutely, there are so many ways in preparing it relative to the selected noodles the proteins, and the vegetables that one feels are best for the dish. Here are a few popular pancit varieties you can experiment with: Pancit Noodles Cooking Tips This pancit recipe uses fresh, wholesome and readily available ingredients to come up with tasty mishmash that is ideal for any time. Whether Filipino cuisine is something you’re really into, or you enjoy exploring pancit noodles now and then, you will love this dish. Therefore, collect your groceries and have a tasty, warm bowl of pancit now! Read similar posts:

Read More
How to make cassava cake
Cuisine
Anupama Mishra

Irresistible Filipino Cassava Cake Recipe: A Sweet Delight with a Rich History

Rating: 4.8/5 | Preparation Time: 1 hour 15 minutes Cassava cake is a favourite Filipino dessert primarily due to it is spongy and sticky like texture and coconut flavour. This cassava cake recipe is definitely one of the easiest and tastiest treats to make that would surely remind you of your childhood. Do you have no idea on how to prepare Filipino cassava cake or you just need some reminder on preparing this type of cake? Scroll through this guide to learn how to prepare the best Filipino cassava cake at the comfort of your home. Brief History of Cassava Cake Lets delve into the history of Cassava Cake. Read more: Best Tres Leches Cake Recipe To Try in 2024 Ingredients for Cassava Cake Recipe For the cake base: For the topping: How to Make Cassava Cake: Step-by-Step Instructions Step 1: Prepare the Cake Mixture First turn the oven on at 350°F (175°C), and next, grease a 9by13-inch baking pan. In a large bowl, mix the grated cassava with condensed milk, coconut milk evaporated milk, sugar and beaten eggs. Mix the given ingredients very well making sure that all gets into the mixture. To spice it up a little you can add a touch of vanilla essence into the batter or sprinkle some grated cheese on top of the mixture. Step 2: Bake the Cassava Cake After that the cassava mixture should be poured into the greased baking pan and spread evenly. Put the pan into the heated oven and bake for 45-50 minutes, during which the top has to become firm homogenous colouring with the shade of pale gold. When the cake is in the oven, you should begin preparing the topping as well. Step 3: Prepare the Topping In a small sauce pan, combine the coconut milk and the condensed milk on a low heat. Stir at the same time until the mixture turns into thick cream. This, normally, should take about 10-15 minutes. The topping should be placed aside until the cake is done baking. Step 4: Top with the Frosting and Final Bake Finally, when the cake has taken fifty minutes to bake, bake. To prepare the topping spread it evenly throughout the surface of the sunken cake. Put as much grated cheese as you can on top of the coconut mixture spread on the dough. Put the pan back into the oven and broil for an additional 10-15 minutes, until the top becomes golden brown and slightly burned. Step 5: Cool and Serve Lastly, let the cassava cake cool for 30 minutes down before slicing. This will also assist it to set and also to cut into square shapes which are more ideal. 2. Can be eaten warm or at ambient temperature. You can also chill it in the refrigerator and serve it cold, that’ll be perfect for when the sun is scorching. Nutritional Value of Cassava Cake (per serving) Lets look at the nutritional value of Cassava Cake: While cassava cake is undeniably delicious, it’s a rich dessert best enjoyed in moderation. The high carbohydrate content comes from the cassava, while the coconut milk and condensed milk contribute to the fat and sugar content. However, the inclusion of eggs and cheese adds a bit of protein, making this dessert a somewhat balanced indulgence!  Useful Recommendations For a Pre-Eminent Cassava Cake Cassava cake is a classic Filipino dessert that reunites the taste of cassava and coconut that are comforting for many Filipinos. It is so simple to make, and so rewarding, and it is suitable for all occasions. This cassava cake recipe is perfect for a simple get together or even for a special take home snack on the weekends. Try it and feel the Filipino comfort that we can easily get right in our own homes! Read similar posts:

Read More
How to make Yaki Udon noodles
Cuisine
Anupama Mishra

Delicious & Easy Yaki Udon Recipe: A Flavorful Japanese Stir-Fry

Rating: 5/5 Preparation Time: 20 minutes  Cooking Time: 10 minutes  Total Time: 30 minutes  Yaki Udon is one of the most famous Japanese stir-fry noodle dishes that uses thick and chewy udon noodles accompanied with vegetables and sauce and sometimes with chicken or tofu. In fact, it’s one of the fastest meats to prepare and works wonders for a weeknight dinner.    The History of Yaki Udon Read more: Beef Udon Noodles Recipe: 1 Of The Best Japanese Bowls Ingredients for Chicken Yaki Udon For this easy yaki udon recipe, you’ll need simple and accessible ingredients: Step-by-Step Yaki Udon Recipe Step 1. Prepare the Udon Noodles Pitted medium-l large shrimp to skin and deveined Cook fresh or frozen udon noodles, as instructed on the package. When they are done, empty them and run under cold water so as to halt the cooking process. Set them aside. Step 2. Prepare the Chicken Finely chop the chicken breast that is cut lenghtwise into strips. It is important to season the chicken with additional 1 tbsp of soy sauce before grilling. Step 3. Stir-Fry the Chicken Heat 1 tbsp of vegetable oil in a large pan or wok, over medium high heat. Toss in the chicken and cook for about 4- 5 minutes till it had fully cooked through. Take out the chicken from that pan of drippings and keep aside for the subsequent stages. Step 4. Cook the Vegetables Put the remaining of 1 tbsp of oil into the pan. Saute the garlic for 30 seconds and until it turns to brown. As for the recipe, add the onions, carrots, cabbage, and bell pepper. Sauté for 2-3 minutes until the vegetables start to turn tender, yet still crunchy to the bite. Step 5. Combine the Ingredients – Put back the cooked chicken to the pan. Mix in the room temperature udon noodles and mix all the ingredients together. Add the soy sauce, oyster sauce, mirin if you used it and sugar into the mix. Stir the ingredients together so that the noodles and the chicken are coated with the sauce. Step 6. Finish and Serve Stir in the rest of the mix for another 2 minutes, ensuring everything is sauté nicely and hot. It is best served hot but can also be eaten cold accompanied by strips of green onions, toasted sesame seeds, and pickled ginger. Serve hot. Nutritional value (Per Serving) Tips for Making the Perfect Yaki Udon This chicken yaki udon recipe is a perfect balance of savory, sweet, and umami flavors with a satisfying mix of textures. It’s versatile, quick to make, and can easily be adapted to suit your taste. Enjoy your homemade yaki udon and savor the authentic taste of Japan! Read similar posts:

Read More
How to make Gyoza sauce
Cuisine
Anupama Mishra

Irresistibly Tangy Gyoza Sauce Recipe You’ll Want to Drizzle on Everything! (5-Minute Recipe)

Rating: 4.9/5 Preparation Time: 5 minutes Well, all fans of dumplings will know that the key which transforms a great meal into something incredibly tasty is, without a doubt, the sauce. This easy gyoza sauce recipe can be put together with mere minutes and adds an extra hit of tang and umami to your dumplings or spring rolls, or you could even incorporate it into a stir fry. The gyoza sauce is a traditional Japanese dipping sauce which is mostly associated with gyoza, Japanese dumplings similar to Chinese jiaozi. Also, it is a combination of the right balance of salty, sour, and umami flavour and known to be made from soy sauce, vinegar, sesame oil and in which other components can be added to make it spicy or sweet. What is Gyoza Sauce? (A Brief Origin) Here’s why it’s so popular: Read more: Cinnamon Applesauce Recipe: A Sweet And Savory Homemade Happiness Ingredients for Gyoza Sauce Recipe To make this gyoza sauce recipe at home, you’ll need just a handful of simple ingredients, many of which are pantry staples. Here’s what you’ll need: How to Make Gyoza Sauce: Step-by-Step Instructions Want to try making this delicious sauce? Here is how you can prepare the best gyoza sauce in record time avoiding the hustle of going through so many complicated steps. Step 1: Combine the Soy Sauce and Vinegar Soy sauce and rice vinegar; add these in a small bowl, and whisk it together. This forms the salty and tangy of the base sauce. Step 2: Add Sesame Oil and Optional Ingredients Add sesame oil which brings a rich undertone to the dish. If you want some spiciness you can sprinkle some red pepper flakes or a few drops of chili oil. But to add more flavor to your recipe, chop garlic and ginger and add them to our blend. Step 3: Optional Sweetness To make it a tad more on the sweet side, some users add a bit of mirin or a pinch of sugar. Step 4: Garnish A sprinkling of green onions in fine slice is a perfect compliment to add on top of the Seebeans delight. Step 5: Serve You should consume the sauce right after preparing gyoza, dumplings, or pour it over stir-fry vegetables or rice. Nutritional Value Here’s the nutritional breakdown per serving of gyoza sauce (approx. 2 tablespoons): This sauce is low in calories but quite high in sodium due to the soy sauce. You can opt for a low-sodium soy sauce if you’re watching your salt intake. Where to Use Gyoza Sauce? Although it was made for gyoza this sauce can be used in other recipes This sauce is perfect for gyoza, but it can be applied to different sorts of dishes. Here are some creative ways to incorporate it into your meals: This gyoza sauce recipe is only a few basic ingredients, but really adds something special to homemade or even store-bought dumplings. The sauce has a convenient amount of spiciness that can be regulated and the tangy umami flavor gives it a perfect spot on any cook’s pantry. It doesn’t matter if you’re attending a dinner party or if this is just dinner for the family, your guests and family will surely love this gyoza sauce. Try it and once you do that there is no going back to the bottled juices again. Don’t forget to save this page to your favorites or forward this post to other food enthusiasts planning on enhancing their dumpling skills! Read similar posts:

Read More
How to make Gnocchi recipe
Cuisine
Anupama Mishra

Gnocchi Recipe: The Italian Homemade Dish

Rating: 5/5 Preparation time: 40 minutes Cook time: 5 minutes Total time: 45 minutes In case you enjoy Italian meals, I bet you have already heard this word “gnocchi” (Gnocchi recipe) several times. These small pieces of food are made using powdered potatoes and various other ingredients such as flour and eggs. Gnocchir recipe is one of the beloved comfort foods made in every Italian household. They can be dressed with oil and sage or served with a hearty tomato sauce, polyzehnovie impresses with its diversity and, even if you thought that would be difficult to recreate at home, you are sorely mistaken. Summary of Gnocchi Recipes History After learning a bit about the history of gnocchi, let’s move on to the recipe! Read more: Super Delicious Crockpot Lasagna Soup Recipe in 2024 Ingredients for Gnocchi: How to Make Gnocchi: Step-by-Step Instructions Step 1: Begin with the selection of the proper potatoes. Russet or Yukon Gold potatoes are the best because they are starchy and less juicy. The main ingredient, potatoes should be boiled whole with the skin intact until they feel tender when poked with a fork, about 20 minutes. Peeling the skin helps potatoes not to absorb excess water on it that would make the gnocchi dough sticky. Step 2: When the food is ready the first process to prepare the potatoes is to peel and mash them.After boiling the potatoes they should be drained and can even be left to cool a little before frying. Peel off the skin with the help of your fingers or with a small kitchen knife. After boiling drain the potatoes and using a potato ricer or a fork mash the potatoes until smooth and fluffy for the fluffy gnocchi. According to some recipes, after the potatoes have been mashed, these should be allowed to cool completely. Step 3: Using a clean,floured surface, proceed to shape the mashed potato into a well. Pour the flour on top of the potatoes, and in the centre of the well mix the beaten eggs and a complimentary pinch of salt. Slowly add the flour and egg to the potatoes and mix with your hands using a folding movement until you get a tacky feeling. Step 4: After the dough has been made, divide it into several lesser portions to make work easier. Shape each piece into a long rope about three quarter inch thick all the way. In order to produce small dumplings, the rope should be sliced into pieces of one inch thickness. When making gnocchi of the former shape, it is easier to role every piece over the back of a fork to create ridges that can capture the sauce. Step 5: Make a large quantity of lightly salted water to come to a simmer. This is the reason, as I mentioned, the addition of the gnocchi has to be in batches, to avoid too many of them in the pot or pan. When the gnocchi floats to the surface it will be cooked, this will take around 2- 3 minutes. Step 6: Now, you have to introduce your gnocchi! You can either put them in butter with some fresh sage to achieve a rather elegant dish, or put them in a rich tomato sauce. Either way you choose, you are assured of something wonderful. Nutritional Value of Gnocchi (Per Serving) Tips for Perfect Gnocchi Recipe Every Time The next time you’re craving something comforting and delicious, remember this gnocchi recipe and impress your family and friends with your culinary skills. Buon appetito! Read similar posts:

Read More

I’m Jessica, your new guide. Welcome to my Cookbook!

Lorem ipsum dolor sit amet, ad consectetur adi picibe elit, sed do eiusmod tempor inci didunt quo labore e dolore magna aliqua ut.

Workshop

Subscribe
Subscribe to our newsletter and be informed about new recipes & workshops.

Follow me on Social Media