Blog

How to make greek couscous salad recipe
Healthy
Anupama Mishra

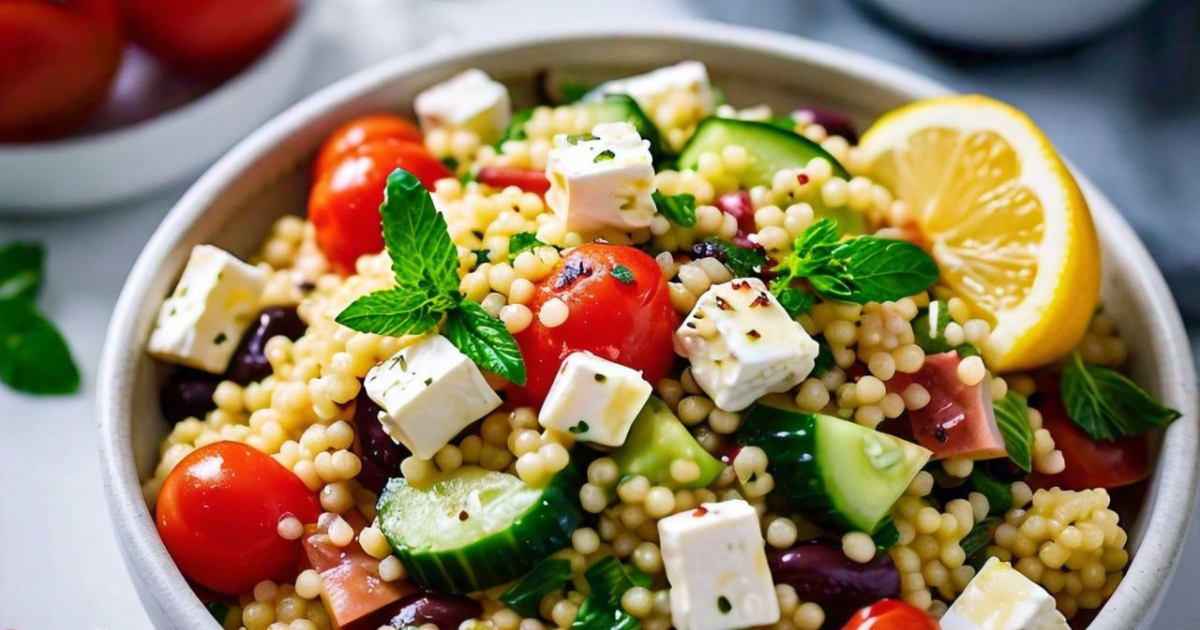
Vibrant and Flavourful Greek Couscous Salad Recipe

Ratings: 4.8/5 Preparation Time: 20 minutes  Greek food is one of the healthiest cuisines as it uses a lot of fresh fruits, vegetables and is full of flavour and this Greek Couscous Salad is no different. This Greek couscous salad is definitely more of the European kind and is great for lighter lunches or as an accompaniment to other dishes, topped with olives, feta, cucumbers and all smothered in a tangy Greek couscous salad dressing. In this blog, we shall provide a guide on how to prepare a delicious Greek couscous salad, its history, the accessories needed, ingredients, how to prepare it and its nutritional value. Tracing Back to the Greek Couscous Salad Couscous salad is a modification of the traditional Greek salad where couscous, a small pasta is used interchangeably for grains. Couscous salad is created based on the Greece’s salad recipes where freshness of the veggies and perfect blend of spices and herbs is served. Here are some key points about the dish’s origins: Read more: Traditional Greek salad recipe- a detailed step-by-step guide! Ingredients for Greek Couscous Salad Here’s everything you’ll need to create this flavorful and healthy salad: For the Salad For the Greek Couscous Salad Dressing How to Make Greek Couscous Salad: Step-by-Step Instructions Step 1: Prepare the Couscous Step 2: Prepare the Greek Couscous Salad Dressing Step 3: Combine the Salad Ingredients Step 4: Add the Finishing Touches Nutritional Value of Greek Couscous Salad This Greek couscous salad is not only delicious but also packs a nutritious punch. Here’s an approximate breakdown per serving: This is why you will enjoy this greek couscous salad recipe Here the Greek couscous salad not only has the fresh, vivid vegetables and the soft, secluded couscous; it also contains the sharp and sharp Greek palatal dressing. It is a perfect meal that thoroughly maximizes the potentials of the Mediterranean cuisine and any salad lover should try this meal. Pro Tip: If one wishes to add more taste to the salad one may grill the bell pepper or even the tomatoes used are sun dried. These minor changes can take the taste factor one notch up higher. If you have any questions about this Greek couscous salad recipe or have any feedback please rate this recipe below and leave a comment. Read similar posts:

Read More
How to make clafoutis recipe
Cuisine
Anupama Mishra

The Perfect Cherry Clafoutis Recipe: A Classic French Delight

Searching for a dessert that stands for a simple dish but at the same time looks sophisticated? Now let me introduce you to one more lovely French dish – clafoutis that is very simple to prepare and is tastes absolutely divine. From the newest home cook to the one who has been cooking for a long time, this cherry clafoutis recipe is going to blow their mind. Like a custard pie that’s full of cherries that can either be juicy or candied, it’s great for all occasions. Clafoutis: OUR EGGCELLENT JOURNEY Clafoutis has had a very long history. Lets see what is it. Read more: Delicious Ron Ron Juice recipe from Jersey Shore! Ingredients for the Best Cherry Clafoutis Recipe Following are the ingredients necessary for this recipe. Step-by-Step: How to Make Cherry Clafoutis Step 1: Prepare the Cherries Wash the cherries with water first defendants Cherries should be washed before anything else. However, if easier handling while eating is a concern, pit the cherries. You can do this for a more classic approach to the recipe, but you don’t have to. Step 2: Preheat and Grease It will be necessary to set your oven to 350°F (175°C) before beginning to bake. Smear a baking dish with butter in a rich layer to avoid the clafoutis from sticking on the bottom. Step 3: Blend the Batter Whisk the eggs and sugar in a large bowl until it is nearly white and light in color. Slowly incorporate the flour and salt with the mixture, whisk until the batter is smooth and lump free. Gradually include the milk and vinegar and the vanilla extract into the mix and stir until you get a lump-free batter. Step 4: Assemble the Clafoutis Place the cherries on a layer on the greased baking dish, as finely spread out as possible. Spoon the batter gently over the cherries so that they are well coated at the base of the tin. Step 5: Bake The clafoutis should be baked in the preheated oven for forty minutes or until the top is slightly brown and it forms a layer on the edges. The center will be slightly jiggly but will begin to firm up as it cools. Step 6: Serve and Enjoy Once baked the clafoutis must be allowed to cool a little for ease of serving and slicing for prettiness. The final stage is just sprinkling with powdered sugar, depending on your preference it can be done lightly or generously. It is best consumed served warm or at room temperature in a temperature controlled environment. Nutritional Value (Per Serving) Lets see how much nutrition this dish holds. Tips for Perfecting Your Clafoutis Recipe Some useful ideas towards making your Clafoutis recipe even more delectable This tasty cherry clafoutis recipe is incredibly easy to prepare but is a traditional French dish everyone can enjoy at home. It is a light dessert with a custard, and cherries are a product that will touch the hearts of children and grown-ups. Want to try this original clafoutis recipe? Feel free to tell us how it went in the comments section below and even post your own twist! Read similar posts:

Read More
Easy Fideo recipe noodles
Cuisine
Anupama Mishra

Savor the Flavors of Mexico: The Ultimate Fideo Recipe for Perfectly Seasoned Noodles

Ratings: 4.9/5 Preparation Time: 30 minutes  The fideo recipe noodles are both unpretentious and hearty and are most suited to a family dinner or for a weeknight supper. For those who have never prepared fideo noodles before or for those who are regular users of this dish, is a perfect chance to cook an easy and tasty Mexican dish. What is Fideo? Fideo is a type of slender pasta that forms a resemblance with vermicelli and is toasted and boiled in a savoury soup. This is how the beauty of it resides – in the project’s flexibility. It can also be made as a broth dish, or simply as a pasta dish, with tomatoes, garlic and spices which add to the appeal of the meal. History of Fideo Noodles Fiedeo noodles has a very ancient reference. Read more: Easy & Authentic Pancit Recipe for Perfect Noodles Ingredients for the Perfect Fideo Recipe To prepare this comforting bowl of noodles, you will need the following ingredients: Step-by-Step Guide to Making Fideo Noodles Step 1: Toast the Noodles Heat the olive oil in large skillet, over the medium heat. Include the fideo noodles stirring for 3-5 minutes or till golden color. It is important as it gives the noodles that typical and welcome peanutty flavor. Take off from flame and allow to stand. Step 2: Prepare the Sauce Melt butter in the same skillet over medium heat then add the onions and garlic and cook until tender (about 3 minutes). Add diced tomatoes, tomato paste, cumin powder and if you are using chili powder. Leave the mixture to stew for five minutes to enhance the taste of the soup. Step 3: Add the Broth Gradually add the chicken or vegetable stock and mix the soup gently. Reserve 1/2 cup of the mixture and combine the remaining mixture with milk; heat over low heat until the mixture comes to a boil. Step 4: Cook the Noodles Place the toasted fideo noodles into the skillet to cover the broth and make sure the noodles are well spread out. Gently turn the heat down and let those noodles continue cooking for 8-10 minutes, uncovered, until the noodles are perfectly done and majority of the liquids has been absorbed. Step 5: Season and Garnish  When the noodles get soft enough drain and put some salt and black pepper to your preference. But, transfer the skillet to the off-burner and garnish with chopped raw cilantro. It is best to accompany this with a wedge or two of lime. Nutritional Value per Serving While this dish is yummy, it holds a lot of nutrients in it. This dish is a great balance of flavors, offering a comforting yet light meal packed with essential nutrients. Pro Tips for the Best Fideo Noodles Variations to Try This fideo recipe is as close to a Mexican home cook recipe as you can get and is sure to bring warmth, flavor and familiarity. Hi everyone, before leaving don’t forget to rate this recipe and also tell us how you enjoyed your fideo noodles in the comment section! Read similar posts:

Read More
Gluten Free Graham Crackers
Healthy
Anupama Mishra

Crispy and Delicious Gluten Free Graham Crackers Recipe: Perfect for Every Sweet Craving!

Rating: 4.9/5 Preparation Time: 30 minutes + chilling time (1 hour) If you’ve been searching for a gluten free graham crackers recipe that will be as crispy, sweet and flavourful as the original, read on! These graham crackers are perfect to have on hand whether you are making s’mores, a graham cracker pie crust or even to munch on in between baking. This flaky and the mildly sweet biscuit will soon be part of your frequently baking recipes when you are Gluten-free. Graham crackers history Read more: Delicious Costco Chicken Salad Recipe: A Perfect Blend of Freshness and Flavour Ingredients for Gluten-Free Graham Crackers For this simple yet delicious recipe, you’ll need the following ingredients. This yields about 24 graham crackers: For Chocolate Graham Crackers (Optional) Step-by-Step Guide: How to Make Gluten-Free Graham Crackers Step 1: Mix the Dry Ingredients In a big bowl with the help of a whisk beat the gluten-free flour, almond flour, brown sugar, granulated sugar, baking powder, cinnamon, and salt. Make certain all the ingredients have blended well with one another. Step 2: Cut in the Butter Finally put the cold butter cut into cubes into the mixture containing the flour. While still cold, using a pastry cutter or your fingers, cut the butter into the flour until the mixture resembles one. However, the butter should not be melted fully to the batter but rather choreographed well into the mixture. Step 3: Add the Wet Ingredients In another bowl, dissolve the honey (or maple syrup), vanilla extract and cold water. Slowly pour this mixture into the dry ingredients and mix until you get a dough. If the dough is dry add another tablespoon of water. Step 4: Chill the Dough The dough should then be helped to take a round shape then covered with a plastic foil and left to cold for at least an hour. Refrigerating the dough assists especially when rolling it and prevents crackers from becoming too spread while baking. Step 5: Roll and Cut the Dough Turn the oven on to a preheat to 350 degrees Fahrenheit (or 170 degrees Celsius). Put the dough in refrigerator and when it is ready, take two sheets of parchment paper and roll the dough to approximately 1/8 inch thick. Take the top parchment paper off and using a knife or a pizza cutter divide the dough into squares or rectangles. It’s truly crucial to have the proper graham cracker texture; so, use a fork to gently prick holes into each square. Step 6: Bake the Crackers Place the dough with the aid of parchment paper onto another baking sheet. Bake for 15-18 minutes or until the edges are glossy, golden brown all over. Watch the crackers as gluten-free baked foods tend to burn easily. Step 7: Cool and Enjoy After baking, let the gluten-free graham crackers stay on the tray until after they have cooled. They will crisp up further as they cool, achieving that perfect crunch. Tips for Making Perfect Gluten-Free Graham Crackers Nutritional Information (per cracker) It is incredibly easy to make gluten-free graham crackers at home in just a few steps to bring joy to the whole family. This recipe works well for those on a gluten-free diet or for those who want to experiment with some new dishes, which provide a crispy crust in every piece. Therefore, do not wait for any further invitation and get your ingredients today and start baking. With this gluten-free graham crackers recipe, you don’t have to buy those crackers from the stores again, when you can make them at home. If you are planning a camping trip, have a family gathering, or simply want a snack that’s both delicious and healthy, these homemade crackers will not disappoint. Read similar posts:

Read More
how to make healthy pumpkin bread recipe
Healthy
Anupama Mishra

Wholesome and Delicious: Your Guide to the Perfect Healthy Pumpkin Bread Recipe

Rating: 4.8/5  Prep Time: 10 minutes  Cook Time: 50 minutes  Total Time: 1 hour  Servings: 10 slices If you are in search of a way to enjoy the essence of this season by indulging in seasonal food cravings and still maintain a healthy diet, this healthy pumpkin bread recipe is for you. Oh, such a delicious delight boosted with the natural taste of pumpkin and spices, and providing a perfect amount of energy for the day! The History of healthy Pumpkin Bread: What’s more is that healthy pumpkin bread is a favorite all through the autumn season and has a long history. Here’s a brief history: Read more: Gluten Free Pumpkin Bread Recipe: Best Way To Enjoy Pumpkin? Ingredients for Healthy Pumpkin Bread: Before you begin baking, gather the following ingredients: Step-by-Step Instructions for healthy pumpkin bread recipe: Step 1: Preheat and Prepare This preheating of the oven is done to set the temperature to 350 degree fahrenheit / 175 degree celsius. Prepare a loaf tin 9 x 5 inch and grease it and if possible line it with parchment paper. Step 2: Mix Wet Ingredients To this, in a large bowl, add and mix the pumpkin puree, honey, eggs, melted coconut oil, almond milk and vanilla extract until blended well. Step 3: Combine Dry Ingredients In another bowl, mix whole wheat flour, bicarbonate of soda, bicarbonate of powder, salt, cinnamon, nutmeg, ginger, and cloves. The components of this spice make the bread tastier in the traditional pumpkin spice fashion. Step 4: Mix It All Together Slowly and gently add the dry ingredients into the wet one. Fold gently until the last streak is disappearing but be very careful not to mix more than this. Chopped walnuts, if being included, should be mixed into the batter at this point carefully. Step 5: Pour and Bake Spread this batter into the prepared loaf pan. Bake for 50-55 minutes, or until the toothpick inserted in the center comes out clean.* If the top starts browning excessively, then you should cover the loaf with foil, aluminum. Step 6: Cool and Enjoy Loosen and leave the bread to cool in the tin for 10 minutes and then remove it from the tin to cool on a wire rack. Slice and serve! Nutritional Value Per Slice: Tips for the Best Healthy Pumpkin Bread recipe: Why Pumpkin is a Superfood: Pumpkin isn’t just a seasonal ingredient – it’s packed with essential nutrients: Oh, this Easy Healthy Pumpkin Bread recipe is exactly what you need for the autumn or at least, for such days when you want Omni Foods International healthy bake. It is a healthy dish that contains lots of nuts and dried fruits and has a glorious spicy taste that is to become your family’s favorite. So, what are you waiting for? Treat your family and yourself to this healthy pumpkin bread recipe today without worrying about taking in extra calories! Read similar posts:

Read More
coq au vin recipe
Cuisine
Anupama Mishra

Coq au Vin Recipe: A Classic French Dish with a Rich History

Prep Time: 25 minutes | Cook Time: 1 hour 30 minutes | Total Time: 1 hour 55 minutes | Rating: 5/5 Coq au Vin Recipe– ‘Chick in Wine’ – is one of the famous branded French style cooked dishes which typically requires a complex of easily cooked excellent ingredients and well-cooked-in-vine. This outstanding and simple recipe of chicken cooked with red wine, mushrooms, onions, and chicken seasonings is perfect for any dinner parties and family get-together occasions. History of Coq au Vin Lets understand how it came into existence Read more: Chicken Salad Recipe With Apples: A Better Way To Enjoy Your Salad Ingredients for Coq au Vin Recipe Followings are the essential ingredients to make this dish a success. Step-by-Step Guide to Making Chicken Coq au Vin Step 1: Start with the marinade process of the chicken. Put the chicken pieces in a large bowl into which pour the wine. Another takes a small bunch of garlic, several sprigs of thyme, and one bay leaf. You might say that it is best to cover and refrigerate for at least 4 hours or better yet, for the night. Step 2: In a big deep pan, done the bacon till crispy over medium heat. Take the bacon out with the help of a slotted spoon leaving the bacon fats in the pot. Step 3: Take the chicken out of the marinating bowl, discard the marinade and dressing the chicken with some salt and black pepper. Fry the chicken pieces in the bacon fat, 3-4 minutes per side until the pieces are golden brown. Remove the chicken from the spicy sauce and place it on a plate and set aside. Step 4: At the same pot, also put the pearl onions, mushrooms and carrot. Stir for about 5-7 minutes or until they have turned soft. Next, throw in the minced garlic and tomato paste stirring the mixture for about one minute. Step 5: Pour the brandy into the pot and then carefully light it with a long match or lighter carefully. Let the alcohol evaporate and the sauce’s taste become richer. Step 6: Put back the seared chicken into the pot. That’s when you introduce the reserved wine marinade, chicken broth, thyme, and bay leaf into the mix. Heat it up until it can simmer and then reduce the heat. Cover and simmer for 1 to 1.5 hours, when chicken has become tender and is well-done. Step 7: When the chicken is done, lookup from the pot. To make the paste combine 2 tablespoons of flour and softened butter. Use this mixture to whisk into the sauce in an effort to thicken it up. Continue processing it for an additional of 10 minutes. Step 8:  Add the chicken back into the pot and mix in the cooked bacon and top with parsley. Accompany this coq au vin with mashed potatoes, or buttered noodles or even crusty bread which will complete the meal. Nutritional Value Per Serving This is the nutrition of this meal per serving Tips for the Perfect Coq au Vin Some Points to be Considered while Making Coq au Vin Coq au vin recipe is the perfect choice when you want to impress your guests with a classic French meal. Whether you’re cooking it for a special occasion or just a cozy dinner at home, this dish is guaranteed to leave everyone asking for seconds. Enjoy this Coq au Vin recipe, and don’t forget to share it with friends who appreciate fine food! Read similar posts:

Read More
Torani Pumpkin sauce recipe
Meals
Anupama Mishra

The Best Torani Pumpkin Sauce Recipe: A Fall Favourite You’ll Love!

If you wish to brew coffee and add nice latte blends, garnishing desserts with pumpkin, or simply enjoy the great taste of pumpkins – this Torani Pumpkin Sauce Recipe is for you. Now let us turn the spotlight on the ingredients, its history and how to prepare this tastiest sauce at home. Brief History of Torani Pumpkin Sauce Recipe Let’s delve into the origins of Torani Pumpkin Sauce recipe Read more:Copycat Starbucks Pumpkin Bread Recipe Torani Pumpkin Sauce recipe Ingredients Creating your own Torani Pumpkin Sauce is simple and requires just a few basic ingredients. Here’s what you need to make this delicious sauce: How to Make Torani Pumpkin Sauce Follow these easy steps to whip up your Torani Pumpkin Sauce in no time: Step 1: Gather Ingredients Before starting the preparation, include all the ingredients, and measure them in terms of their portions. Step 2: Combine the Ingredients To the medium saucepan, pour the Torani Pumpkin Pie Syrup, pumpkin puree and brown sugar. Mix well over medium heat until the sugar melts and all the ingredients combine properly. Step 3: Add the Cream and Spices Incorporate the heavy cream into the mixture as soon as it starts boiling and let it boil for 3-4 minutes. Do not let it stick to the base; mix it continuously to avoid the charcoal from burning. Next stir in the cinnamon, nutmeg as well as ginger. Stir for further 3-5 minutes or until the sauce thickens. Step 4: Add Vanilla Extract and Salt After this turn off the heat on the stovetop and take the saucepan away from the heat. Lastly add the vanilla extract and a pinch of salt to boost the intensity of the flavors. Step 5: Cool and Store Allow the sauce to cool down. When it cools down, pour it into an airtight jar or bottle. Delicious Ways to Use Torani Pumpkin Sauce recipes Now that you’ve made your Torani Pumpkin Sauce, here are some creative ways to enjoy it: Nutritional Value of Torani Pumpkin Sauce recipe Per serving (approx. 2 tablespoons): The Torani Pumpkin Sauce Recipe is a flavourful and indulgent addition to your fall favourites. While it does contain sugar and cream, the richness of the pumpkin puree and spices make it a well-balanced treat. This homemade Torani Pumpkin Sauce Recipe is perfect for adding a touch of autumn to your favourite dishes. Not only is it delicious, but it’s also incredibly easy to make. Share your thoughts: Have you tried making your own Torani Pumpkin Sauce? Leave a comment below and let us know how it turned out! Read similar posts:

Read More
How to make baked tilapia recipe
Healthy
Anupama Mishra

Perfectly Baked Tilapia Recipe: A Quick & Flavourful Dinner Delight

Rating: 4.8/5 Prep Time: 10 minutes  Cook Time: 15 minutes  Total Time: 25 minutes  If you are searching for a healthy tasty and quick recipe for dinner then oregano pasta is for you. So, what could be better than this baked tilapia recipe? Tilapia is a low-fat fish, and it absorbs the flavours and seasonings very well making it very versatile in the preparation. The oven-baked tilapia recipe is great for when you need your meal fast as it is full of flavour and nutrients. Done in less than half an hour it’s suitable for weeknight cooking or when you fancy something lighter on the weekend. A Quick History of Tilapia Read more: The Best Baja Fish Tacos Recipe Ingredients You’ll Need For this oven-baked tilapia recipe, you only need a few simple ingredients: Step-by-Step Guide to the Best Baked Tilapia Recipes Steps 1: Preheat the Oven First, let’s set the oven to 400Fahrenheit degrees or 200 centigrade. It is recommended to cover a baking sheet with aluminum foil or parchment paper for easier cleanup. Step 2: Prepare the Tilapia Fillets This is especially important if the fish will be grilled: remove any moisture by patting the tilapia fillets with a paper towel. This step assists in attaining the right texture when baked. Step 3: Season the Fillets In a small dish combine olive oil, minced garlic, paprika, oregano, onion powder, salt and pepper. Spread this mixture evenly on the tilapia fillets by use of a brush on both sides of the fillets. Step 4: Arrange for Baking Put the seasoned tilapia fillets on a baking sheet that has been prepared for baking. Place lemon slices on the fillets and around as well. Oranges make it very refreshing as they bring out the taste of oranges which indeed goes well with fish. Step 5: Bake the Tilapia Put the baking sheet into the oven and bake for 12-15 minutes until the fish are soft and easily flaky with a fork. Cooking at high heat should not go beyond 12 minutes; otherwise the fillets might dry up. Step 6: Serve and Enjoy Optional garnish the baked tilapia with fresh parsley. Enjoy on the spot with other side dishes you prefer such as roasted vegetables, quinoa or just a side salad. Nutritional Value per Serving (1 Fillet) Tilapia is a lean fish that holds good proportions of calories, proteins, unsaturated fats and is a source of niacin, phosphorus, selenium and vitamin B12. It is ideal for anyone on a heart health, or low fat diet plan. How to Cook Oven-Baked Tilapia recipes – Expert Advice This oven-baked tilapia recipe is a sure way to enjoy good tasty food without taking much time to prepare it in the kitchen. Freshwater fish is a source of quality protein that is versatile, so, whether you are a lover of seafood or just getting into fish, there is no better fish to start with than the Tilapia. Remember to leave your thoughts and impressions by the end of the piece and leave a rating in the comment section. Read similar posts:

Read More
How to make pumpkin marble cheesecake
Snacks
Anupama Mishra

Deliciously Decadent: Easy Pumpkin Marble Cheesecake Recipe

Rating: 4.8/5 Preparation Time: 20 minutes | Baking Time: 60 minutes | Total Time: 80 minutes  For a dessert that has the taste of the fall and creaminess, you should try this Pumpkin Marble Cheesecake. This easy pumpkin marble cheesecake recipe helps create an attractive dish you will appreciate the recipes for pumpkin and regular cheesecake in it. The history of pumpkin marble cheesecake recipe Read more: Strawberry Cheesecake Cookies Recipe: 1 Bowl Of Sweet Fruity and Cheesy Happiness Ingredients To make this easy pumpkin marble cheesecake, you’ll need the following ingredients: For the Crust: For the Cheesecake Filling: Instructions Step 1: Prepare the Crust Initial what you want to cook in your oven for cooking at 325 °F ( 160 °C). In a medium mixing bowl, blend the graham cracker crust, melted butter and sugar two tablespoons. Smooth this mixture well onto the bottom of a 9-inch springform pan. Some recipes instruct you to bake the crust for about 10 minutes before removing and letting it cool, while other encourage you to bake it until it is golden brown and then proceed with filling preparation. Step 2: Make the Cheesecake Batter Cream the softened cream cheese and sugar in bowl using an electric mixer till it is smooth and creamy in large bowl. Mix the eggs into the batter one by one and make sure to beat it after each addition. Mix in the vanilla extract and keep on blending until you get a sleeky consistency of the batter. Step 3: Separate and Add the Pumpkin There are two possibilities – divide the cheesecake batter in half. In one portion, add the pumpkin puree, cinnamon, nutmeg, ginger and cloves into the mixture. Stir until all have blended into one mass. Step 4: Create the Marble Effect To layer, spoon the plain cheesecake batter and the pumpkin batter back and forth into the crust. After all the batter is in the pan use a butter knife and roughly mix the two mixtures to produce a swirl effect. Do not over mix the batter because the swirl design that is intended to be achieved will be difficult to obtain. Step 5: Bake the Cheesecake Transfer the cheesecake to the preheated oven and bake for 55-60 minutes, or until the edges turn a little more brown and the center is a little bit wobbly. Switch off the oven and allow the cheesecake to cool inside the oven with the door ajar for an hour. This helps prevent cracking. Finally, make sure to chill the cheesecake in the refrigerator for about 4 hours or even better overnight before serving. Nutritional Information (per serving) Following is the nutritional value for the dish above. Tips for a Perfect Pumpkin Marble Cheesecake This Pumpkin Marble Cheesecake recipe is an excellent example of pairing cheesecake with pumpkin spice which I believe is perfect for any fall celebration. From the beautiful marbling of the cake to the simplicity involved in preparing it to how it tastes, it will hit the favorites list in your family events. So why wait? This is a very simple pumpkin marble cheesecake that you should try out before the season runs out because the taste of pumpkin is simply amazing. Read similar posts:

Read More
How to make Yaki Udon noodles
Cuisine
Anupama Mishra

Delicious & Easy Yaki Udon Recipe: A Flavorful Japanese Stir-Fry

Rating: 5/5 Preparation Time: 20 minutes  Cooking Time: 10 minutes  Total Time: 30 minutes  Yaki Udon is one of the most famous Japanese stir-fry noodle dishes that uses thick and chewy udon noodles accompanied with vegetables and sauce and sometimes with chicken or tofu. In fact, it’s one of the fastest meats to prepare and works wonders for a weeknight dinner.    The History of Yaki Udon Read more: Beef Udon Noodles Recipe: 1 Of The Best Japanese Bowls Ingredients for Chicken Yaki Udon For this easy yaki udon recipe, you’ll need simple and accessible ingredients: Step-by-Step Yaki Udon Recipe Step 1. Prepare the Udon Noodles Pitted medium-l large shrimp to skin and deveined Cook fresh or frozen udon noodles, as instructed on the package. When they are done, empty them and run under cold water so as to halt the cooking process. Set them aside. Step 2. Prepare the Chicken Finely chop the chicken breast that is cut lenghtwise into strips. It is important to season the chicken with additional 1 tbsp of soy sauce before grilling. Step 3. Stir-Fry the Chicken Heat 1 tbsp of vegetable oil in a large pan or wok, over medium high heat. Toss in the chicken and cook for about 4- 5 minutes till it had fully cooked through. Take out the chicken from that pan of drippings and keep aside for the subsequent stages. Step 4. Cook the Vegetables Put the remaining of 1 tbsp of oil into the pan. Saute the garlic for 30 seconds and until it turns to brown. As for the recipe, add the onions, carrots, cabbage, and bell pepper. Sauté for 2-3 minutes until the vegetables start to turn tender, yet still crunchy to the bite. Step 5. Combine the Ingredients – Put back the cooked chicken to the pan. Mix in the room temperature udon noodles and mix all the ingredients together. Add the soy sauce, oyster sauce, mirin if you used it and sugar into the mix. Stir the ingredients together so that the noodles and the chicken are coated with the sauce. Step 6. Finish and Serve Stir in the rest of the mix for another 2 minutes, ensuring everything is sauté nicely and hot. It is best served hot but can also be eaten cold accompanied by strips of green onions, toasted sesame seeds, and pickled ginger. Serve hot. Nutritional value (Per Serving) Tips for Making the Perfect Yaki Udon This chicken yaki udon recipe is a perfect balance of savory, sweet, and umami flavors with a satisfying mix of textures. It’s versatile, quick to make, and can easily be adapted to suit your taste. Enjoy your homemade yaki udon and savor the authentic taste of Japan! Read similar posts:

Read More

I’m Jessica, your new guide. Welcome to my Cookbook!

Lorem ipsum dolor sit amet, ad consectetur adi picibe elit, sed do eiusmod tempor inci didunt quo labore e dolore magna aliqua ut.

Workshop

Subscribe
Subscribe to our newsletter and be informed about new recipes & workshops.

Follow me on Social Media