Blog

Halloween Cakes
Meals
Anupama Mishra

Spooktacular Halloween Cakes: Easy and Scary Treats to Delight Your Guests

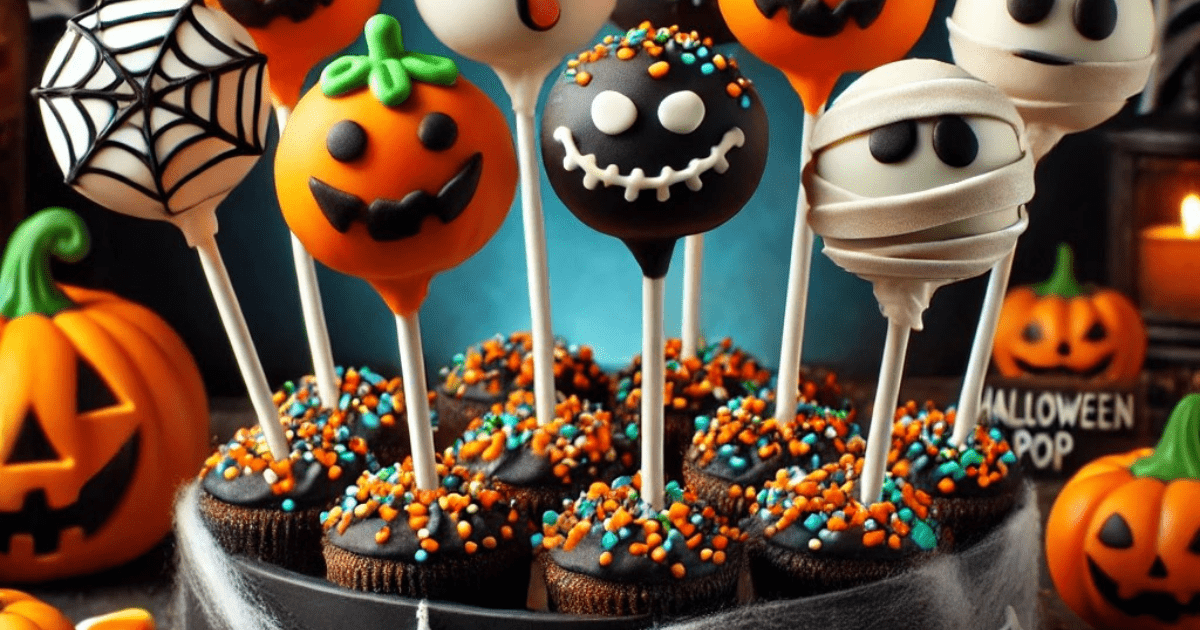
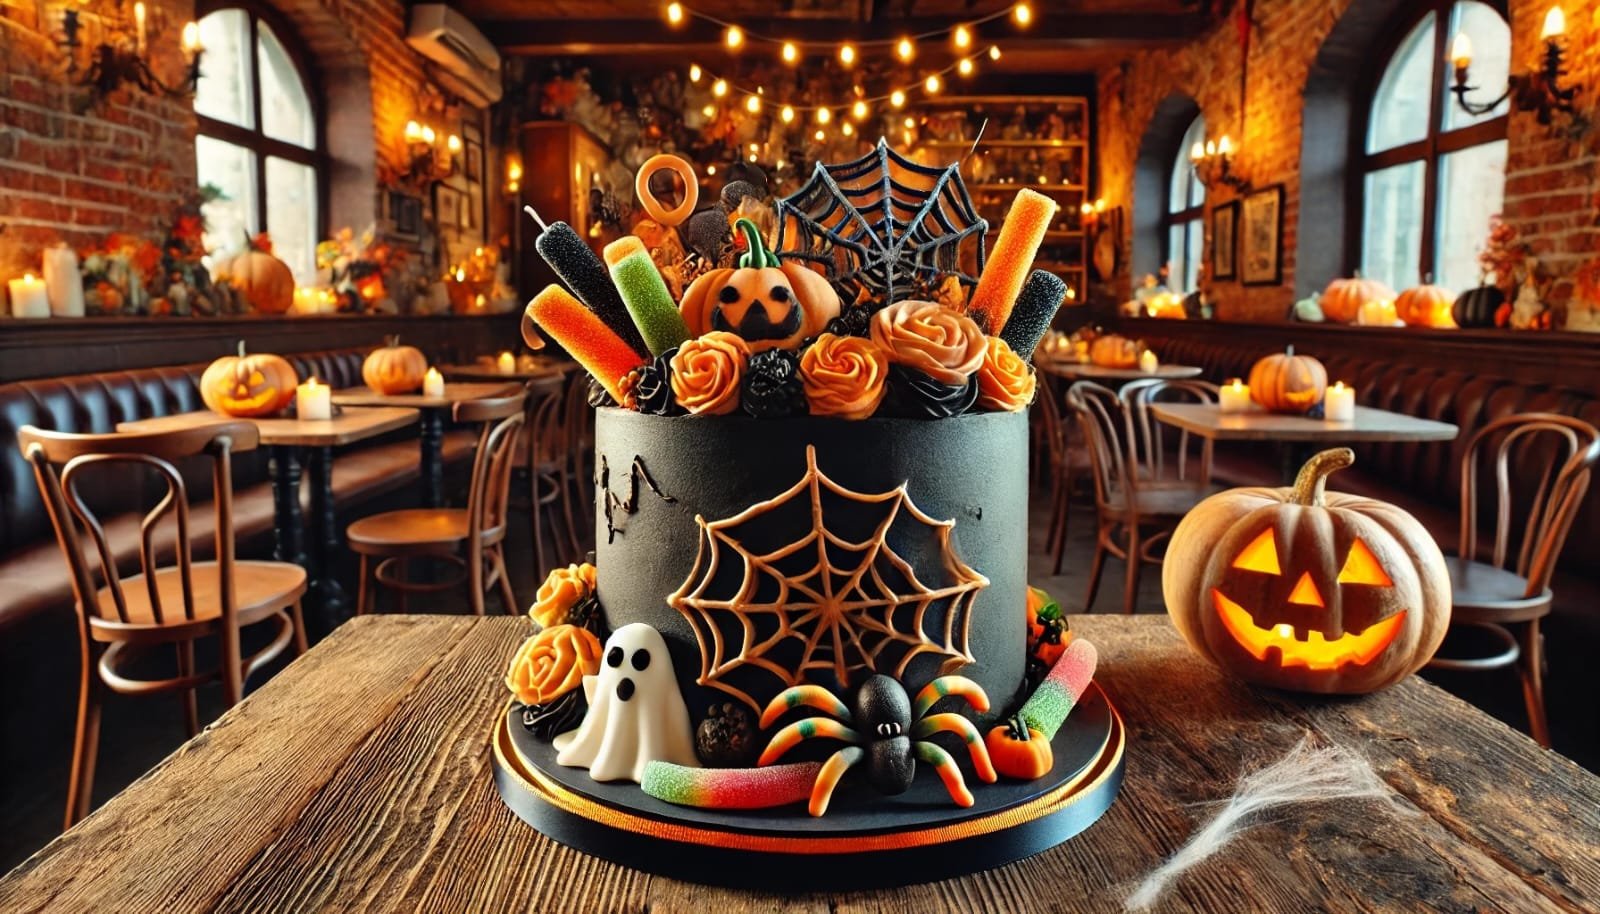
Overall Rating: 4.8/5  Preparation Time: 1 hour 30 minutes If you fancy injecting some creepiness to the Halloween festive season, Halloween cakes are just amazing as they add a sweet, but spooky note to your celebration! As we have seen, baking cakes is independent of one’s experience and regardless of whether you are a first-time or experienced baker looking for Halloween cakes for kids, you will find something that suits you. This blog will show you some of the best and most terrifying Halloween cakes that will make your party incredible. So without further ado, let’s take a look at some Halloween baking ideas! A Brief History of Halloween Cakes Read more: The Viral Japanese Cheesecake Recipe Ingredients for Spooky Halloween Cake For a basic chocolate Halloween cake base, you’ll need: For decoration (choose your level of spookiness!): Steps to Make Your Scary Halloween Cake Step 1: Preheat your oven Set it to 350°F (180°C). Preheat oven to 350 F. Grease two 9-inch round cake pans. Step 2: Mix dry ingredients Stir flour, sugar, cocoa, baking powder, baking soda, and salt in a big bowl. Step 3: Add wet ingredients Then add eggs, milk, oil, and vanilla to the mixture. Mix well, then slowly incorporate the hot water into the mixture. It will be a very thin batter which is just what you want for this casserole. Step 4: Bake Skeletonize the preparation of the batter by pouring half into each pan and baking for 30-35 minutes or until a toothpick can be inserted and come out clean. Let cool completely. Step 5: Prepare the frosting If you are planning to make chocolate frosting or buttercream, you may add food coloring to make it have a black and orange color. Step 6: Decorate Here’s where the fun begins! Step 7: Finishing Touches Include any other Halloween decorations such as tombstones, small pumpkins, ghost sugar paste, etc. Go ahead and put your creativity up on the block! Nutritional Information (per serving) Top 3 Halloween Cake Ideas Halloween cakes are as much fun and creative as you want them to be while baking them. These are pretty much going to steal the thunder of your Halloween party considering that we are talking about Halloween cake here or more specifically scary Halloween cake. Remember to post pictures of your creations on Facebook and Twitter and invite your friends to view them as a fun way to scare yourself silly! Read more:

Read More
Halloween Cake Pops
Meals
Anupama Mishra

Spooky Halloween Cake Pops: A Wickedly Fun Recipe for the Perfect Treat

Rating: 4.5/5  Prep Time: 1 hour 30 minutes  Halloween is the perfect time to make something that looks and tastes great while being scary at the same time! These Halloween Cake Pops are not just snacks with the right look but are also perfect for entertaining kids while preparing them. Here we’ll walk you through the process of how to make Halloween-themed cake pops that are just as tasty as they are terrifying. It is a sweet delicacy filling with delicious and you can surprise each age with the most simple ingredients at home. A Quick Bite of Cake Pops History Read more: Spider Cookies Recipe for Halloween! Ingredients To make these Halloween cake pops, gather the following: Cake:  Frosting: Decorations: Step-by-Step Halloween Cake Pops Recipe Step 1: Bake the Cake Step 2: Crumble and Mix Step 3: Shape the Cake Balls Step 4: Insert the Sticks Step 5: Decorate Step 6: Let Them Set Nutritional Value (Per Cake Pop) Advice for Ideal Halloween Cake Pops Halloween Cake Pops Recipe Questions & Answers Q: How long are Halloween cake pops good for?  A: Halloween cake pops can also be stored and last for up to one week in the refrigerator. Q: Can I use homemade cake?  A: Absolutely! In case you wish, substitute the cake mix with a homemade cake base. These Halloween Cake Pops are ideal for your Halloween parties. If you want to make them for a Halloween party to give in the form of a gift or just for fun then I am sure, all these cake pops are going to be wonderful. Well, are you ready to turn this Halloween into a spooky one with some great recipes? Please collect your requirements with us and let’s begin! Happy Halloween! Read more:

Read More
How to make cassava cake
Cuisine
Anupama Mishra

Irresistible Filipino Cassava Cake Recipe: A Sweet Delight with a Rich History

Rating: 4.8/5 | Preparation Time: 1 hour 15 minutes Cassava cake is a favourite Filipino dessert primarily due to it is spongy and sticky like texture and coconut flavour. This cassava cake recipe is definitely one of the easiest and tastiest treats to make that would surely remind you of your childhood. Do you have no idea on how to prepare Filipino cassava cake or you just need some reminder on preparing this type of cake? Scroll through this guide to learn how to prepare the best Filipino cassava cake at the comfort of your home. Brief History of Cassava Cake Lets delve into the history of Cassava Cake. Read more: Best Tres Leches Cake Recipe To Try in 2024 Ingredients for Cassava Cake Recipe For the cake base: For the topping: How to Make Cassava Cake: Step-by-Step Instructions Step 1: Prepare the Cake Mixture First turn the oven on at 350°F (175°C), and next, grease a 9by13-inch baking pan. In a large bowl, mix the grated cassava with condensed milk, coconut milk evaporated milk, sugar and beaten eggs. Mix the given ingredients very well making sure that all gets into the mixture. To spice it up a little you can add a touch of vanilla essence into the batter or sprinkle some grated cheese on top of the mixture. Step 2: Bake the Cassava Cake After that the cassava mixture should be poured into the greased baking pan and spread evenly. Put the pan into the heated oven and bake for 45-50 minutes, during which the top has to become firm homogenous colouring with the shade of pale gold. When the cake is in the oven, you should begin preparing the topping as well. Step 3: Prepare the Topping In a small sauce pan, combine the coconut milk and the condensed milk on a low heat. Stir at the same time until the mixture turns into thick cream. This, normally, should take about 10-15 minutes. The topping should be placed aside until the cake is done baking. Step 4: Top with the Frosting and Final Bake Finally, when the cake has taken fifty minutes to bake, bake. To prepare the topping spread it evenly throughout the surface of the sunken cake. Put as much grated cheese as you can on top of the coconut mixture spread on the dough. Put the pan back into the oven and broil for an additional 10-15 minutes, until the top becomes golden brown and slightly burned. Step 5: Cool and Serve Lastly, let the cassava cake cool for 30 minutes down before slicing. This will also assist it to set and also to cut into square shapes which are more ideal. 2. Can be eaten warm or at ambient temperature. You can also chill it in the refrigerator and serve it cold, that’ll be perfect for when the sun is scorching. Nutritional Value of Cassava Cake (per serving) Lets look at the nutritional value of Cassava Cake: While cassava cake is undeniably delicious, it’s a rich dessert best enjoyed in moderation. The high carbohydrate content comes from the cassava, while the coconut milk and condensed milk contribute to the fat and sugar content. However, the inclusion of eggs and cheese adds a bit of protein, making this dessert a somewhat balanced indulgence!  Useful Recommendations For a Pre-Eminent Cassava Cake Cassava cake is a classic Filipino dessert that reunites the taste of cassava and coconut that are comforting for many Filipinos. It is so simple to make, and so rewarding, and it is suitable for all occasions. This cassava cake recipe is perfect for a simple get together or even for a special take home snack on the weekends. Try it and feel the Filipino comfort that we can easily get right in our own homes! Read similar posts:

Read More
How to make pumpkin marble cheesecake
Snacks
Anupama Mishra

Deliciously Decadent: Easy Pumpkin Marble Cheesecake Recipe

Rating: 4.8/5 Preparation Time: 20 minutes | Baking Time: 60 minutes | Total Time: 80 minutes  For a dessert that has the taste of the fall and creaminess, you should try this Pumpkin Marble Cheesecake. This easy pumpkin marble cheesecake recipe helps create an attractive dish you will appreciate the recipes for pumpkin and regular cheesecake in it. The history of pumpkin marble cheesecake recipe Read more: Strawberry Cheesecake Cookies Recipe: 1 Bowl Of Sweet Fruity and Cheesy Happiness Ingredients To make this easy pumpkin marble cheesecake, you’ll need the following ingredients: For the Crust: For the Cheesecake Filling: Instructions Step 1: Prepare the Crust Initial what you want to cook in your oven for cooking at 325 °F ( 160 °C). In a medium mixing bowl, blend the graham cracker crust, melted butter and sugar two tablespoons. Smooth this mixture well onto the bottom of a 9-inch springform pan. Some recipes instruct you to bake the crust for about 10 minutes before removing and letting it cool, while other encourage you to bake it until it is golden brown and then proceed with filling preparation. Step 2: Make the Cheesecake Batter Cream the softened cream cheese and sugar in bowl using an electric mixer till it is smooth and creamy in large bowl. Mix the eggs into the batter one by one and make sure to beat it after each addition. Mix in the vanilla extract and keep on blending until you get a sleeky consistency of the batter. Step 3: Separate and Add the Pumpkin There are two possibilities – divide the cheesecake batter in half. In one portion, add the pumpkin puree, cinnamon, nutmeg, ginger and cloves into the mixture. Stir until all have blended into one mass. Step 4: Create the Marble Effect To layer, spoon the plain cheesecake batter and the pumpkin batter back and forth into the crust. After all the batter is in the pan use a butter knife and roughly mix the two mixtures to produce a swirl effect. Do not over mix the batter because the swirl design that is intended to be achieved will be difficult to obtain. Step 5: Bake the Cheesecake Transfer the cheesecake to the preheated oven and bake for 55-60 minutes, or until the edges turn a little more brown and the center is a little bit wobbly. Switch off the oven and allow the cheesecake to cool inside the oven with the door ajar for an hour. This helps prevent cracking. Finally, make sure to chill the cheesecake in the refrigerator for about 4 hours or even better overnight before serving. Nutritional Information (per serving) Following is the nutritional value for the dish above. Tips for a Perfect Pumpkin Marble Cheesecake This Pumpkin Marble Cheesecake recipe is an excellent example of pairing cheesecake with pumpkin spice which I believe is perfect for any fall celebration. From the beautiful marbling of the cake to the simplicity involved in preparing it to how it tastes, it will hit the favorites list in your family events. So why wait? This is a very simple pumpkin marble cheesecake that you should try out before the season runs out because the taste of pumpkin is simply amazing. Read similar posts:

Read More

I’m Jessica, your new guide. Welcome to my Cookbook!

Lorem ipsum dolor sit amet, ad consectetur adi picibe elit, sed do eiusmod tempor inci didunt quo labore e dolore magna aliqua ut.

Workshop

Subscribe
Subscribe to our newsletter and be informed about new recipes & workshops.

Follow me on Social Media